Can Ghost Mannequin Reduce Returns? A Complete Guide
Yes, a ghost mannequin reduce returns by showing the true fit of clothes. This visual trick is very smart. By letting shoppers see the real shape of the item without a distracting model, you stop them from making bad guesses. In short, accurate product photos mean far fewer refunds.
To track this, you must use a reliable tool. A ghost mannequin reduce returns calculator helps. By plugging in your new refund numbers and comparing them to your old stats, you will easily see exactly how much cash you save. Basically, tracking your metrics proves the value of good photos.
Clear photos set the right expectations quickly. Buyers trust your shop much more. When people know exactly what they will receive in the mail, they feel safe spending their hard-earned money on your website. Ultimately, clarity helps buyers shop with extreme confidence.
What is a ghost mannequin?
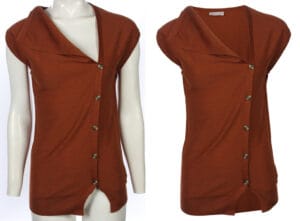
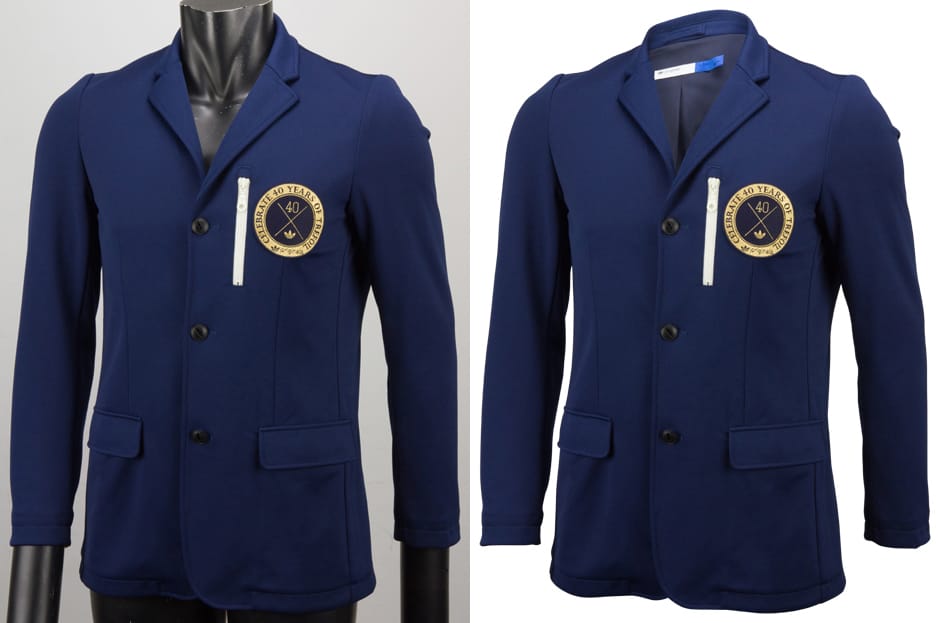
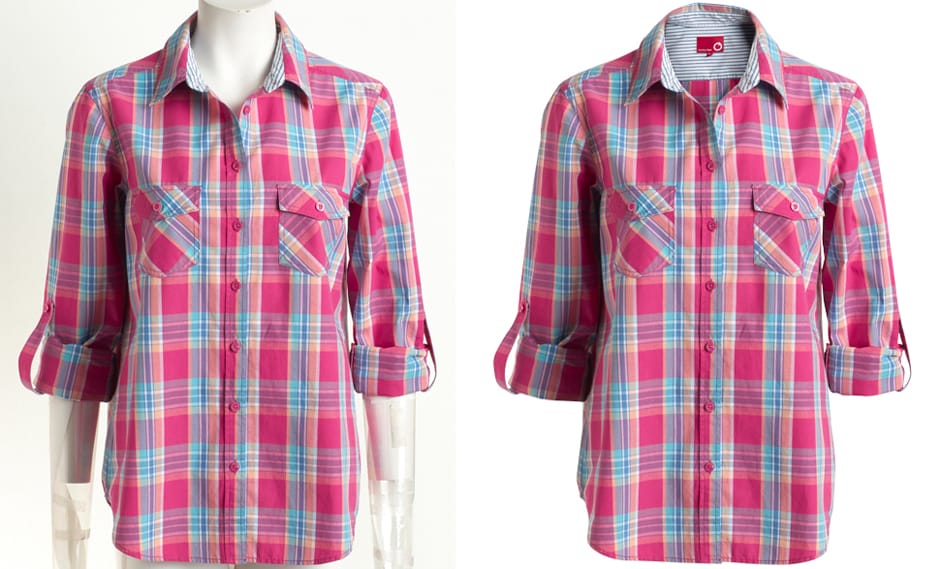
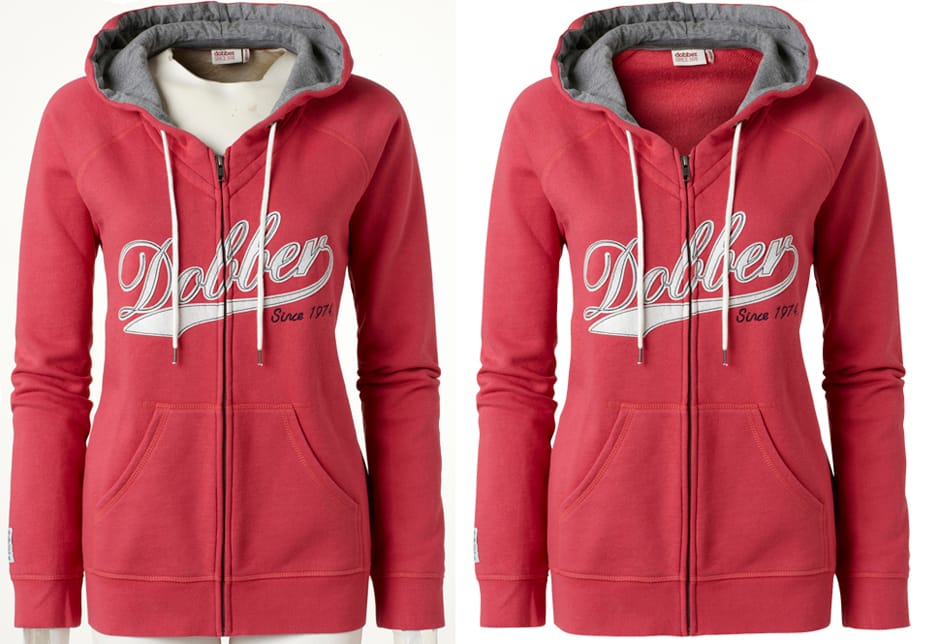
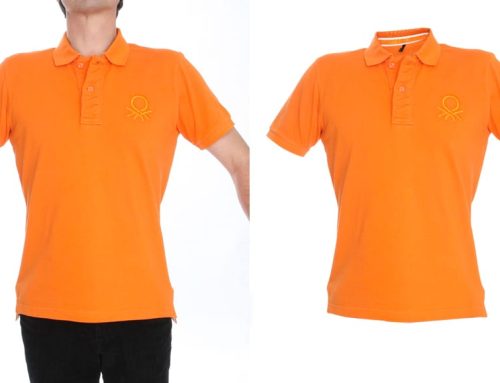
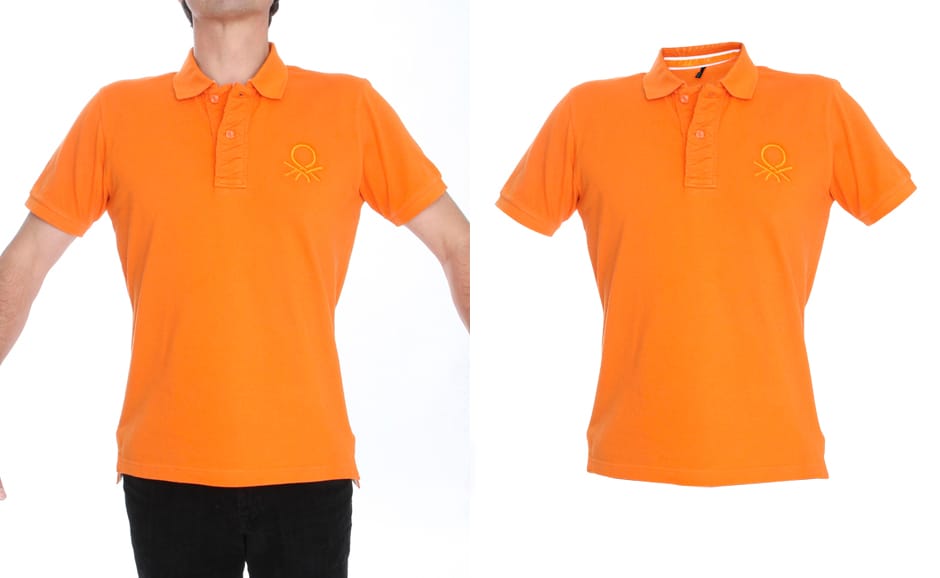
A ghost mannequin is a clever photo editing technique used heavily for clothing. This clever trick works very fast. By carefully removing the physical doll from the picture, the final image presents a hollow item that looks incredible. Put simply, it makes the shirt look like an invisible person wears it.
The ghost mannequin effect gives life to flat clothes instantly. It adds vital volume and depth. Customers absolutely love this specific view because it helps them imagine wearing the garment in their own daily lives. In essence, the ghost mannequin effect creates a realistic 3D look.
You need basic ghost mannequin photography skills to start off. Shoot the front piece and neck. Finally, you merge the two shots inside a photo editor to create a single, flawless image that sells. Simply put, ghost mannequin photography blends two shots into perfect art.
Do ghost mannequin reduce returns and refunds for sellers?
Yes, ghost mannequin reduce returns and refunds by providing visual truth online. Customers see exact sleeve lengths clearly. Because they do not have to guess how the fabric falls, they buy the right size the very first time. Therefore, accurate visuals lead to exact buyer expectations and fewer refunds.
Bad photos lead to high return rates quickly. People buy things that look completely wrong. Clear 3D images fix this annoying issue by showing every single hem, seam, and button in stunning high definition. In short, realistic photos prevent disappointing surprises upon delivery.
If you search online, you will find huge proof. A ghost mannequin reduce returns reddit threads show. Many happy sellers report massive drops in refund requests after updating their entire product catalog with these images. Basically, community proof shows this method truly works well.
Does ghost mannequin reduce returns to Amazon?
A ghost mannequin reduce returns to Amazon by meeting strict image rules. Pure white backgrounds help immensely. Buyers trust high-quality product listings more because the crisp details give them the confidence to click the buy button. Overall, optimized Amazon photos directly lower your return rates.
Amazon buyers scan pages very quickly today. They want instant visual facts fast. Hollow-mannequin photos provide this exact clarity, stopping users from scrolling away and forcing them to look closely at your fashion items. In summary, fast clarity helps Amazon shoppers make permanent choices.
Even big stores see this positive trend. A ghost mannequin reduce returns at walmart too. High standards apply everywhere in retail, so you must match the giant brands to stay competitive in a crowded market. In fact, major retail platforms reward stores that use pure 3D images.
ghost mannequin services
Does ghost mannequin reduce returns to eBay?
Yes, a ghost mannequin reduce returns to eBay by boosting seller trust. eBay buyers fear bad items. A pro photo looks safe, which makes the buyer feel like they are buying from a real, professional clothing brand. Thus, professional presentation reduces buyer doubt and return requests.
Clear details matter for your online sales. A ghost mannequin reduce returnship costs heavily. You pay less for reverse shipping because your buyers keep the clothes they ordered instead of sending them back to your warehouse. Ultimately, cutting reverse logistics saves your business lots of money.
Late-night shoppers make fast, sleepy choices. A ghost mannequin reduce returns midnight buyers cause. Good photos stop sleepy mistakes because the striking 3D shape wakes up their brain and shows the true product clearly. Briefly, clear images guide buyers at all hours of the day.
Ghost Mannequin Photography Without a Studio: 4 Home Methods That Work
You can shoot ghost mannequin photos at home using four simple methods. These easy tricks save cash. You can use a DIY setup, shape flat lays, blend two photos, or use powerful AI tools to finish. In short, home setups offer cheap ways to get pro results.
| Method | Cost Factor | Quality Level | Time Needed |
| DIY Setup | Very Low | Good | Slow |
| Flat Lay Shape | Free | Fair | Fast |
| Two-Photo Compositing | Medium | Very High | Slow |
| AI Shortcut | Low | Good | Fast |
You do not need a fancy studio. A clean room works just fine. By setting up near a large window, you harness natural light that makes your raw clothing photos look bright, clean, and totally professional. Basically, your living room can become a great photo studio.
A store owner named Frank tried this. Using a ghost mannequin reduce returns frank notes. His home studio worked so well that his total profits doubled within the first three months of uploading the new images. To conclude, real sellers succeed with simple home photo setups.
Method 1: The DIY mannequin setup at home
Buy a cheap dress form and cut off the neck area. Tape the sharp edges nicely. Dress the modified form, style the sleeves, and shoot your garment in bright light to get a solid base photo. Simply put, a modified dress form is a great cheap studio tool.
Good lighting is very crucial right here. Place your setup near a window. Avoid dark room corners because heavy shadows will ruin the fabric texture and make the editing process much harder later on. Essentially, natural window light makes DIY shots look very professional.
You must keep the camera very steady. A cheap tripod is highly required. Blurry photos cannot be fixed, so locking your camera in place ensures that every single pixel stays sharp and clear for editing. To summarize, stable cameras produce the best possible base photos.
Method 2: The flat-lay-to-shape technique
Lay the shirt flat on white paper. Shape the waist and sleeves. Stuff the inside with soft tissue paper to add realistic volume that mimics a real human body resting under the fabric. Overall, tissue stuffing mimics a real body for flat photos.
Make sure to smooth all deep wrinkles. Wrinkles make clothes look very cheap. Iron the item perfectly first, because wrinkles create harsh shadows that confuse the eye and ruin the neat 3D clothing illusion. To summarize, a smooth garment guarantees a clean final picture.
A fashion writer named Adrianna loves this. A ghost mannequin reduce returns adrianna claims. She teaches this fast trick to her readers, proving that even zero-budget brands can create decent, attractive clothing photos at home. In short, experts agree that flat shaping works well.
Method 3: The two-photo compositing method
Shoot the garment on a person first. Then shoot the inner neck. Open both photos in a digital editor and carefully stitch the inner collar behind the front of the shirt to make it hollow. Simply put, combining two photos creates the ultimate invisible illusion.
This takes some time to learn properly. You must practice the pen tool. Cutting out the background requires extreme patience, but the final result looks better than any other cheap method on the market today. Basically, hard work yields the highest quality image possible.
Save your work in high resolution formats. Web platforms compress images very badly. Keeping the raw files large means your product will still look crisp and sharp when Amazon or Shopify shrinks the photo down. In essence, high quality files survive the web upload process.
Method 4: The AI shortcut
Use new AI tools to remove backgrounds. These software programs work instantly. You upload your flat photo, click one button, and the smart robot guesses where the shadows and neck joints should naturally appear. To summarize, AI tools provide a super fast editing option.
AI is not always perfectly accurate yet. It messes up complex lace patterns. While it saves time on basic t-shirts, you might still need a human to fix the strange errors it makes on fancy dresses. Briefly, AI is fast but sometimes lacks a human touch.
Check the edges after the AI finishes. Rough edges ruin the whole look. Smooth them out manually to ensure that the garment looks like a premium item rather than a cheap, rushed internet graphic. Ultimately, a quick manual check saves your brand reputation.
ghost mannequin editing
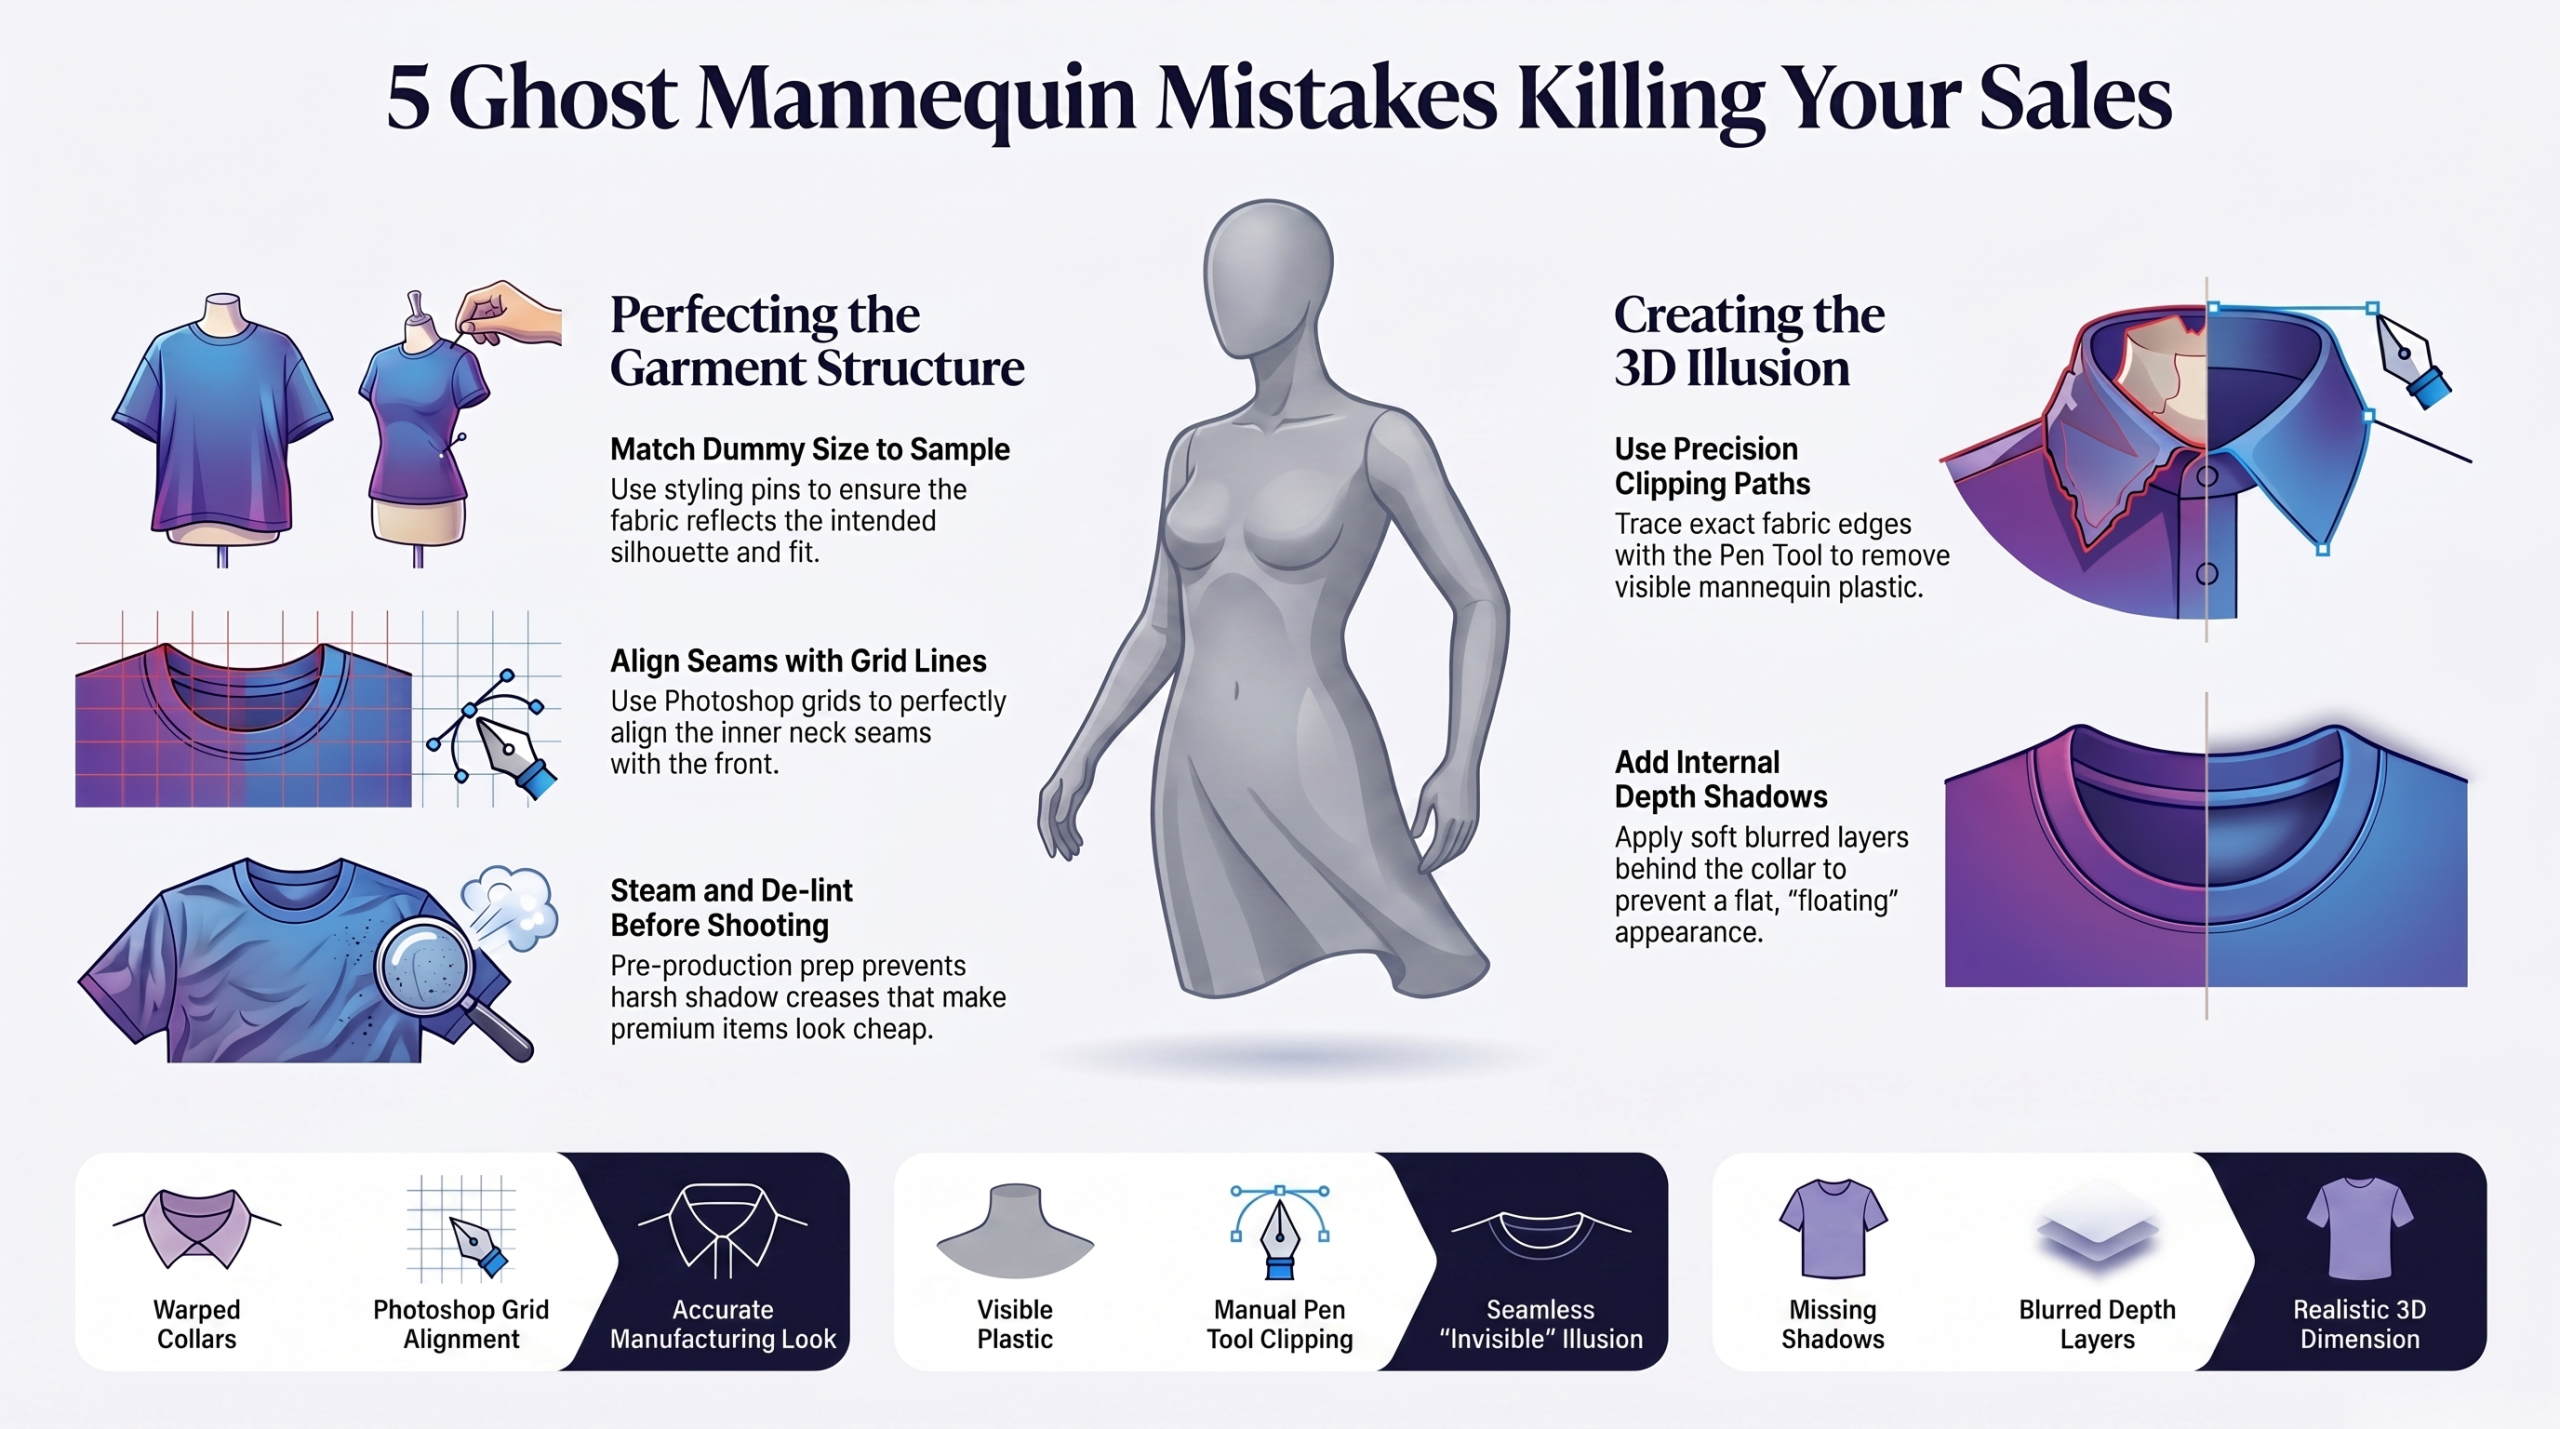
Common Ghost Mannequin Editing Errors and How to Fix Them
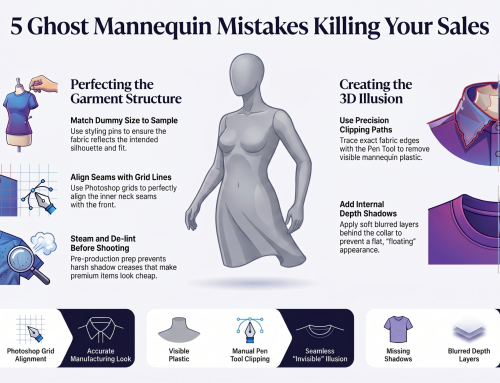
The most common errors include misaligned necks, jagged edges, and bad shadows. These bad mistakes look terrible. You must blend the inner neck perfectly to trick the buyer’s eye into believing the 3D depth. Briefly, clean editing is required to make the invisible effect believable.
Many beginners rush the critical shadow step. A flat neck looks very fake. Adding a soft, dark drop shadow just under the front collar gives the inside of the shirt a realistic, dark, hollow feeling. Essentially, shadows build the necessary depth for clothing.
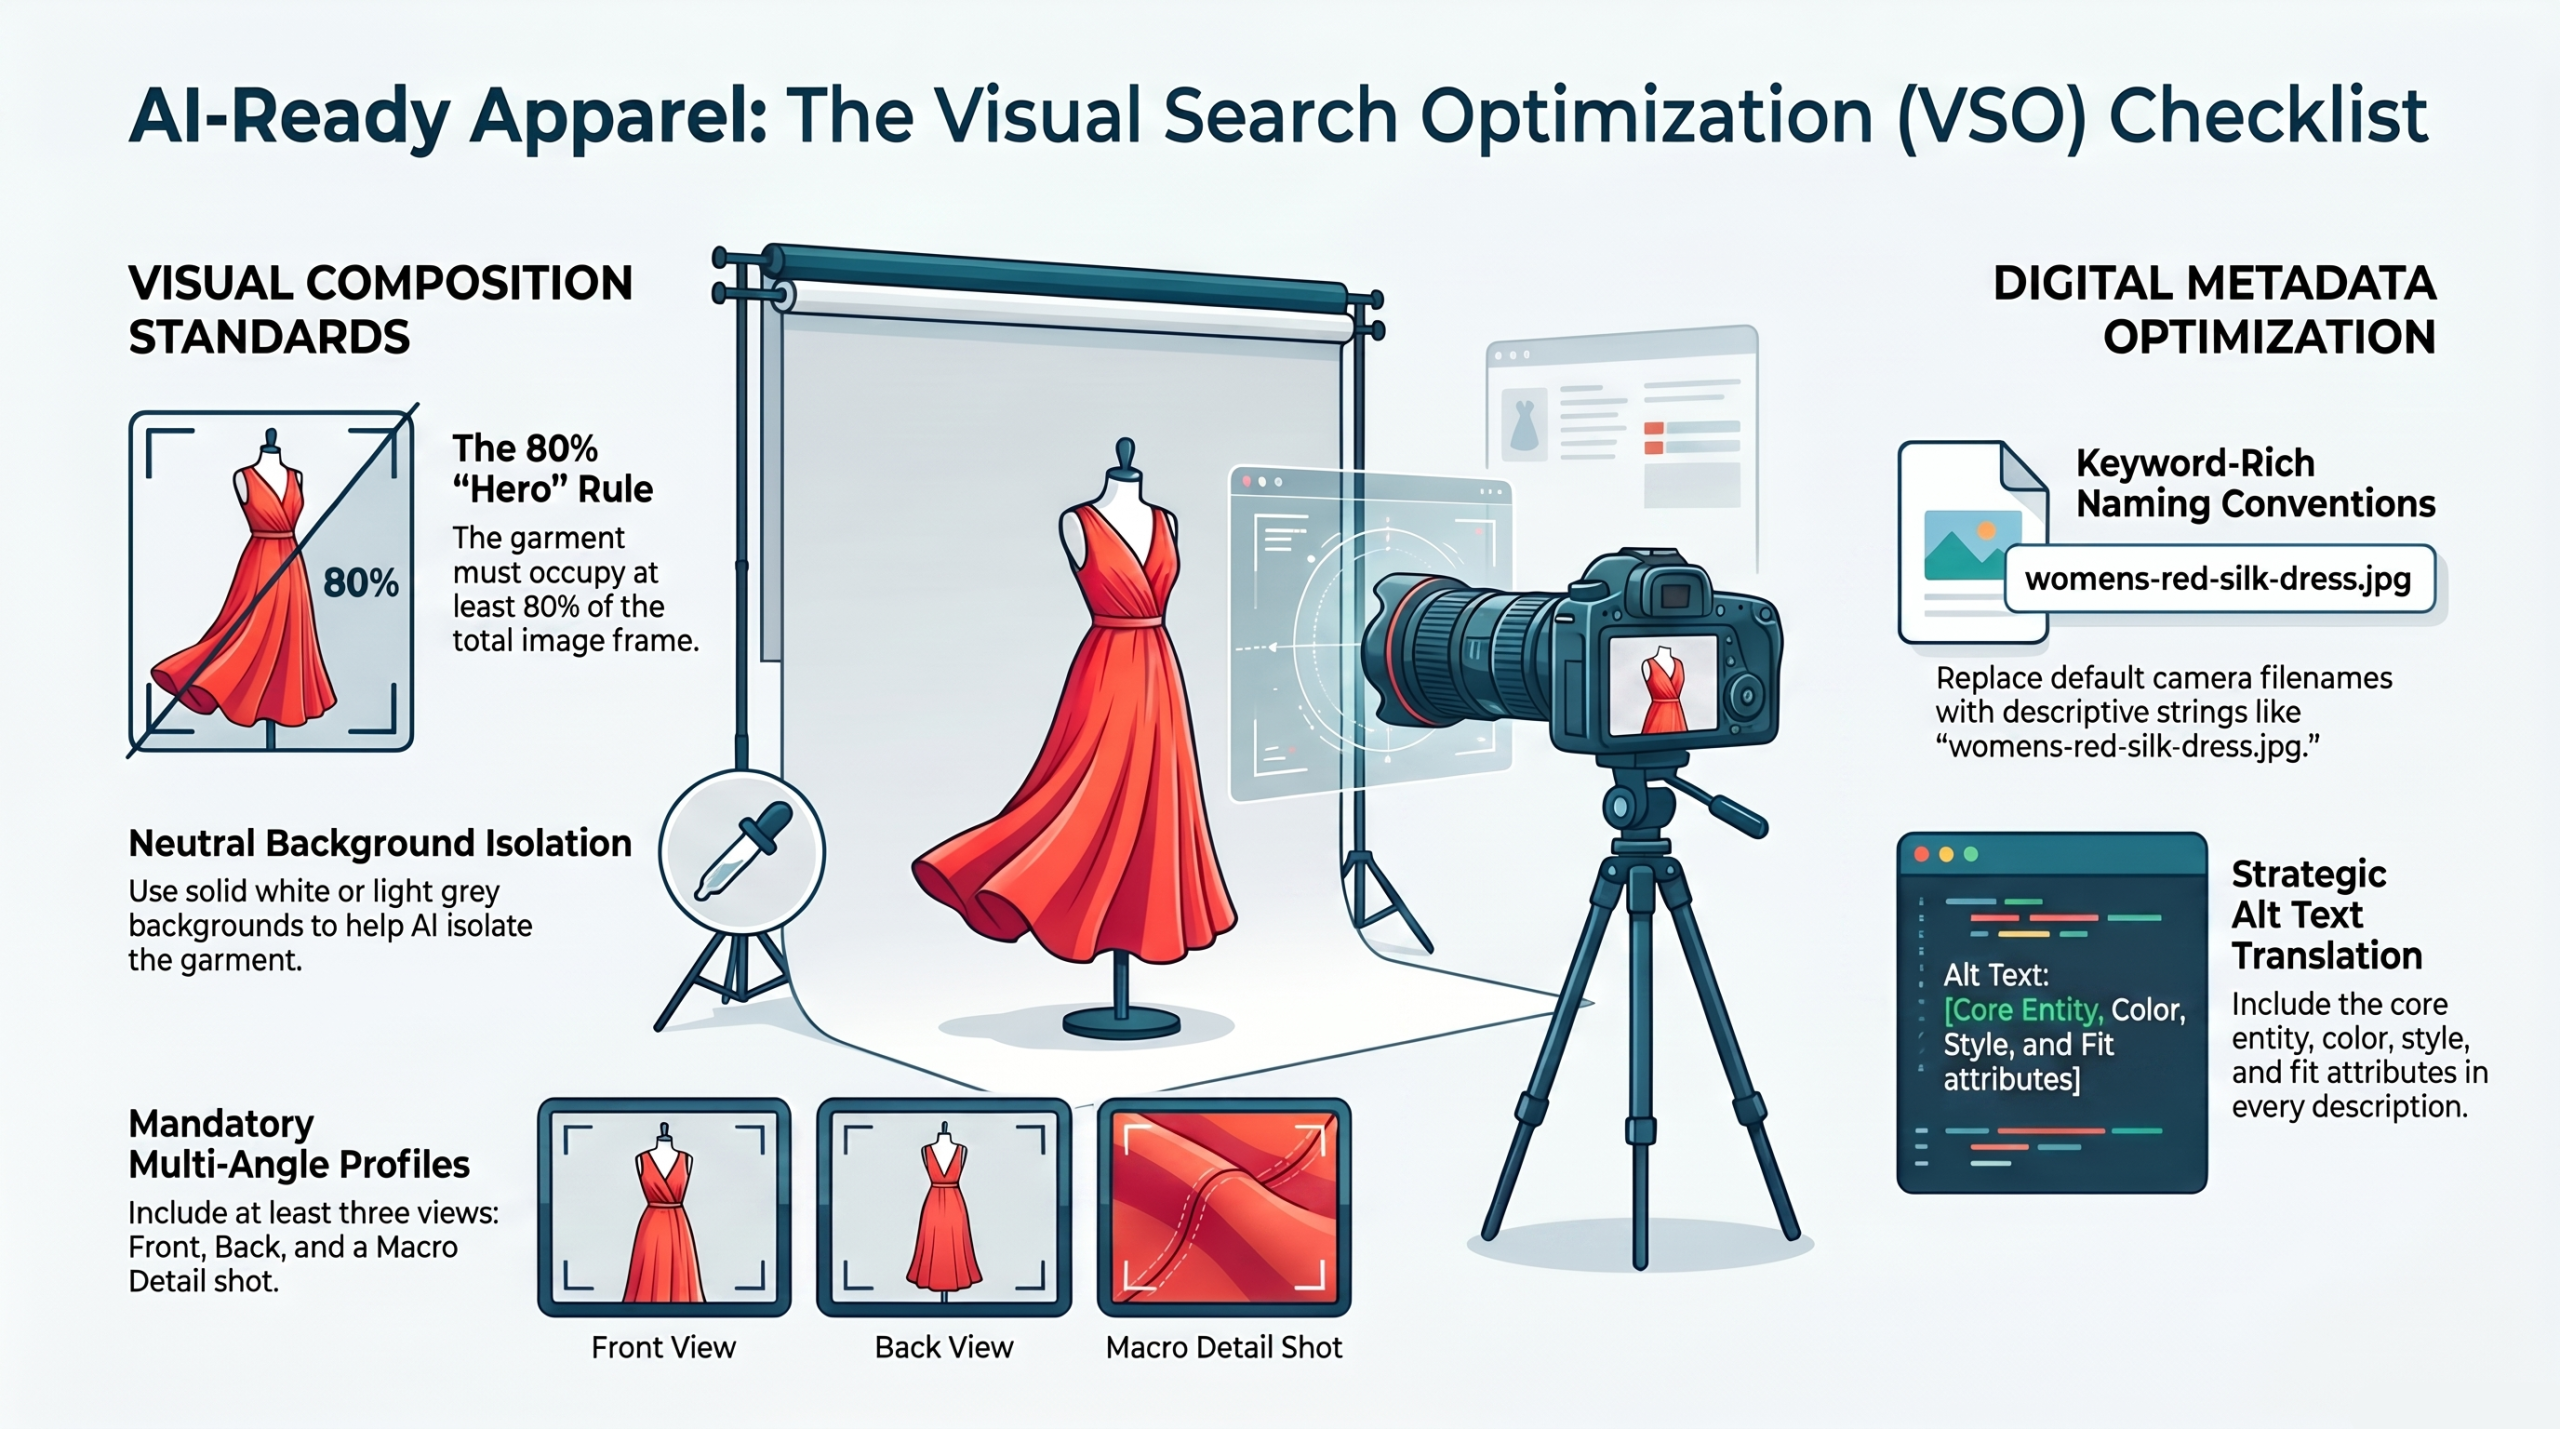
Always use a solid white background color. Off-white shades look quite dirty. True white ensures your images match across your entire website, making your store look like a trusted, high-end, luxury fashion boutique. In short, pure white backgrounds elevate your entire brand aesthetic.
1. Neck Misalignment
A misaligned neck happens when things shift. This breaks the 3D illusion. When the inside back tag does not line up with the front collar, the shirt looks broken and completely wrong to buyers. Therefore, precise seam alignment keeps the garment looking real.
Use warp tools to align the seams. Nudge the pixels very slowly. By bending the inner collar image slightly, you can force the two separate photos to match perfectly at the shoulder line. In essence, careful neck matching preserves the magical illusion.
Zoom in closely on the final joint. The pixels must blur slightly together. A hard line between the front and back looks like a bad sticker, so feather the edges to hide your digital tracks. To summarize, soft blending hides your editing work completely.
2. Uneven Shoulder Structure
Uneven shoulders make clothes look poorly sewn. This flaw scares buyers away. If your mannequin was leaning during the shoot, you must use grid lines in Photoshop to level the garment out perfectly. Basically, straight shoulders make the item look expertly crafted.
The warp tool fixes this issue quickly. Pull the low side upward. Symmetrical clothes sell better because the human eye naturally prefers balanced shapes when judging the quality of a new physical product. In short, perfect symmetry boosts the perceived value of clothes.
Check both sides of the shirt carefully. Measure the exact pixel height. Taking ten extra seconds to verify the balance ensures your final upload looks totally flawless to every single website visitor. Ultimately, careful checking stops bad photos from going live.
3. Visible Mannequin Edges
Leaving plastic pieces in the photo is bad. This mistake looks incredibly lazy. If a buyer sees a plastic neck or a metal pole, the invisible magic dies and the photo looks messy. Simply put, hiding all props is absolutely crucial for success.
Use the pen tool to trace tightly. Do not use magic wands. The magic wand tool leaves a halo of gray pixels around the fabric, which ruins the clean cut needed for professional stores. Therefore, manual tracing creates the sharpest possible clothing edges.
Delete the background layer with great care. Zoom in to five hundred percent. Inspect the entire border of the shirt to catch any tiny stray pixels that the original cut might have missed. In essence, extreme zooming guarantees a perfectly clean final image.
4. Fabric Distortion
Fabric distortion occurs when editors stretch images. The cloth looks horribly melted. Use the clone stamp carefully to avoid this, ensuring the threads and patterns remain mathematically straight across the whole chest area. To summarize, gentle editing prevents clothes from looking unnatural.
Keep the original cotton texture highly visible. Do not blur the fabric. Buyers want to see the real material, so over-smoothing the image makes the shirt look like a weird plastic cartoon drawing. Basically, keeping fabric details helps sell the item faster.
Shadows must follow the fabric folds naturally. Painted shadows look very weird. By using the burn tool lightly on existing creases, you enhance the natural volume without destroying the original lighting of the room. In short, natural shadows keep the photo grounded in reality.
How does a ghost mannequin reduce returns policy abuse?
A strong photo stops fake return claims. A ghost mannequin reduce returns policy disputes. When you have visual proof of the exact shape and drape, buyers cannot easily lie and say the item looks completely different. Thus, accurate photos defend your store against false claims.
Many bad buyers rent clothes for free. They wear and return them. Clear photos set strict baseline rules that help your customer service team win chargebacks when a dishonest buyer tries to steal money. Ultimately, detailed visuals help you enforce your store rules.
Your terms of service become much stronger. Visual evidence backs you up. The combination of clear text policies and undeniable 3D product images creates an ironclad defense for your growing digital business. Basically, great photos provide incredible legal support for sellers.
Professional Ghost Mannequin Service: Invisible Mannequin Photo Editing Guide
Outsourcing to pros saves you hours daily. They handle neck joints expertly. You get perfect files back fast, allowing you to focus on marketing and selling rather than staring at a bright computer screen. Simply put, professional services deliver flawless images quickly.
Doing this yourself takes lots of time. A pro team works overnight. We highly recommend Clipping Path One for this massive task, because their global team delivers flawless cutouts at a very low price. In short, outsourcing photo edits frees up your daily schedule.
Clipping Path One offers elite image cutouts. Their experts edit fashion perfectly. By trusting a dedicated company with your raw files, you ensure every single product looks consistent, clean, and totally ready for market. Overall, Clipping Path One ensures your photos look world-class.
Clipping Path vs Background Removal: Which One Do You Need?
A clipping path uses a vector line. It traces hard product edges. Background removal might use simple pixel erasing, but a hand-drawn path ensures the absolute sharpest border for complex fashion apparel items. Basically, clipping paths provide superior quality for clothing photos.
Background removal works for simple round objects. Fashion needs complex, sharp paths. Shirts have tiny fibers and curved hems that automated background erasers easily destroy, leaving your product looking jagged and totally cheap. To summarize, complex clothes require precise vector path tracing.
Always ask your editor for path files. You might need them later. Having the original vector line saved in the file allows you to easily change the background color for a future holiday sale. In essence, saving paths gives you flexible future marketing options.
Conclusion
Using a ghost mannequin reduce returns drastically. This trick boosts total sales. Customers get a true view of the product’s fit and drape, which completely stops bad assumptions and prevents painful refund requests. To conclude, investing in 3D hollow photos is great for business.
Start with a few items right today. Test your best selling products. You will see a big change in your metrics, proving that high-quality visual presentation is the key to massive retail growth. Ultimately, better product images always lead to happier retail customers.
FAQ
What is a ghost mannequin?
A ghost mannequin is a photo editing technique used heavily in fashion e-commerce. It involves taking multiple photos of a garment and blending them together to remove the mannequin, creating a hollow, 3D illusion. This makes the clothes look like an invisible person is wearing them.
Can ghost mannequin images reduce product returns?
Yes, a ghost mannequin reduce returns by showing the true shape, fit, and drape of a garment. When customers can see exactly how an item is structured without a distracting model, they make better purchasing decisions. Accurate expectations directly lead to significantly lower return rates.
How much does ghost mannequin photography cost?
The cost varies based on your chosen method. A DIY setup at home might cost under fifty dollars for a basic dress form. However, professional editing services like Clipping Path One typically charge between one to three dollars per image for flawless, high-quality composite editing.
What apps are for the ghost mannequin effect?
Several AI-driven apps and software programs attempt to automate the ghost mannequin effect. Popular choices include Photoroom, Pixelcut, and classic Adobe Photoshop. While AI apps are fast, professional designers using Photoshop’s manual pen tool still produce the most realistic and high-quality results for complex apparel.
Does ghost mannequin reduce returns to Amazon?
Yes, using a ghost mannequin reduce returns to Amazon by ensuring your product images meet their strict marketplace standards. Clear, pure white background images that accurately display the 3D volume of a product help Amazon shoppers understand exactly what they are buying, preventing post-purchase dissatisfaction.
