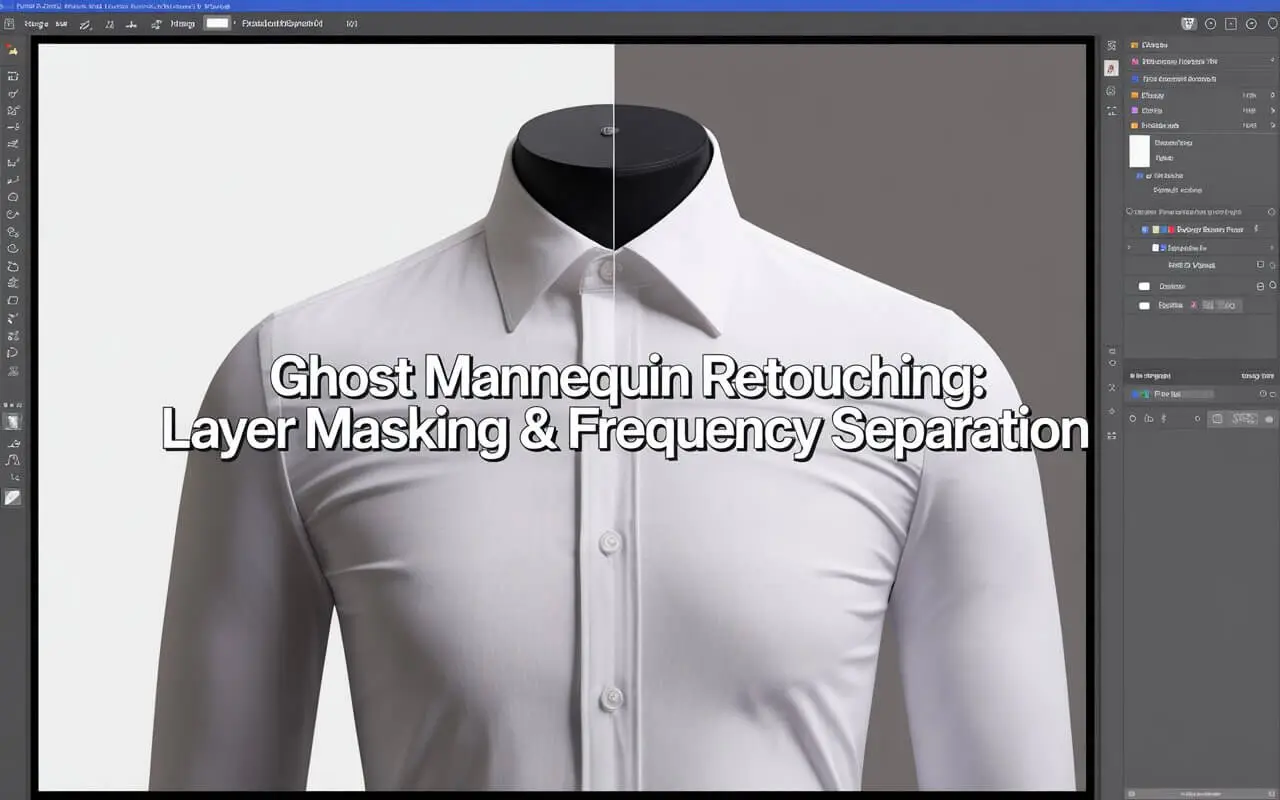
Ghost mannequin retouching removes visible mannequin parts from apparel photos while preserving the garment’s natural 3D shape. The three critical fixes are: softening harsh shadows, maintaining proper silhouette curves, and restoring fabric texture. Master these using layer masking and frequency separation in Photoshop.
Introduction
Let’s be honest. Nothing kills a product’s appeal faster than a hollow neckline that looks like a black hole or a sleeve that appears flattened by a steamroller. Ghost mannequin retouching solves these nightmares by making clothing look like it’s floating—perfectly shaped, beautifully lit, and ready to sell.
This technique, also known as invisible mannequin editing, is the backbone of modern e-commerce photography. Whether you’re selling on Amazon, Shopify, or your own boutique site, customers expect clean, consistent apparel images. They want to see the drape, the fit, and the fabric’s real character. No distractions. No weird shadows. Just the product, perfect.
In this guide, you’ll learn exactly how to fix shadows that look unnatural, reshape garments that lost their form, and restore textures that went flat during editing. You’ll also discover which ghost mannequin retouching software delivers the best results, what ghost mannequin retouching price ranges you should expect from professional services, and whether ghost mannequin AI tools are finally ready for prime time.
What Exactly Is Ghost Mannequin Retouching?
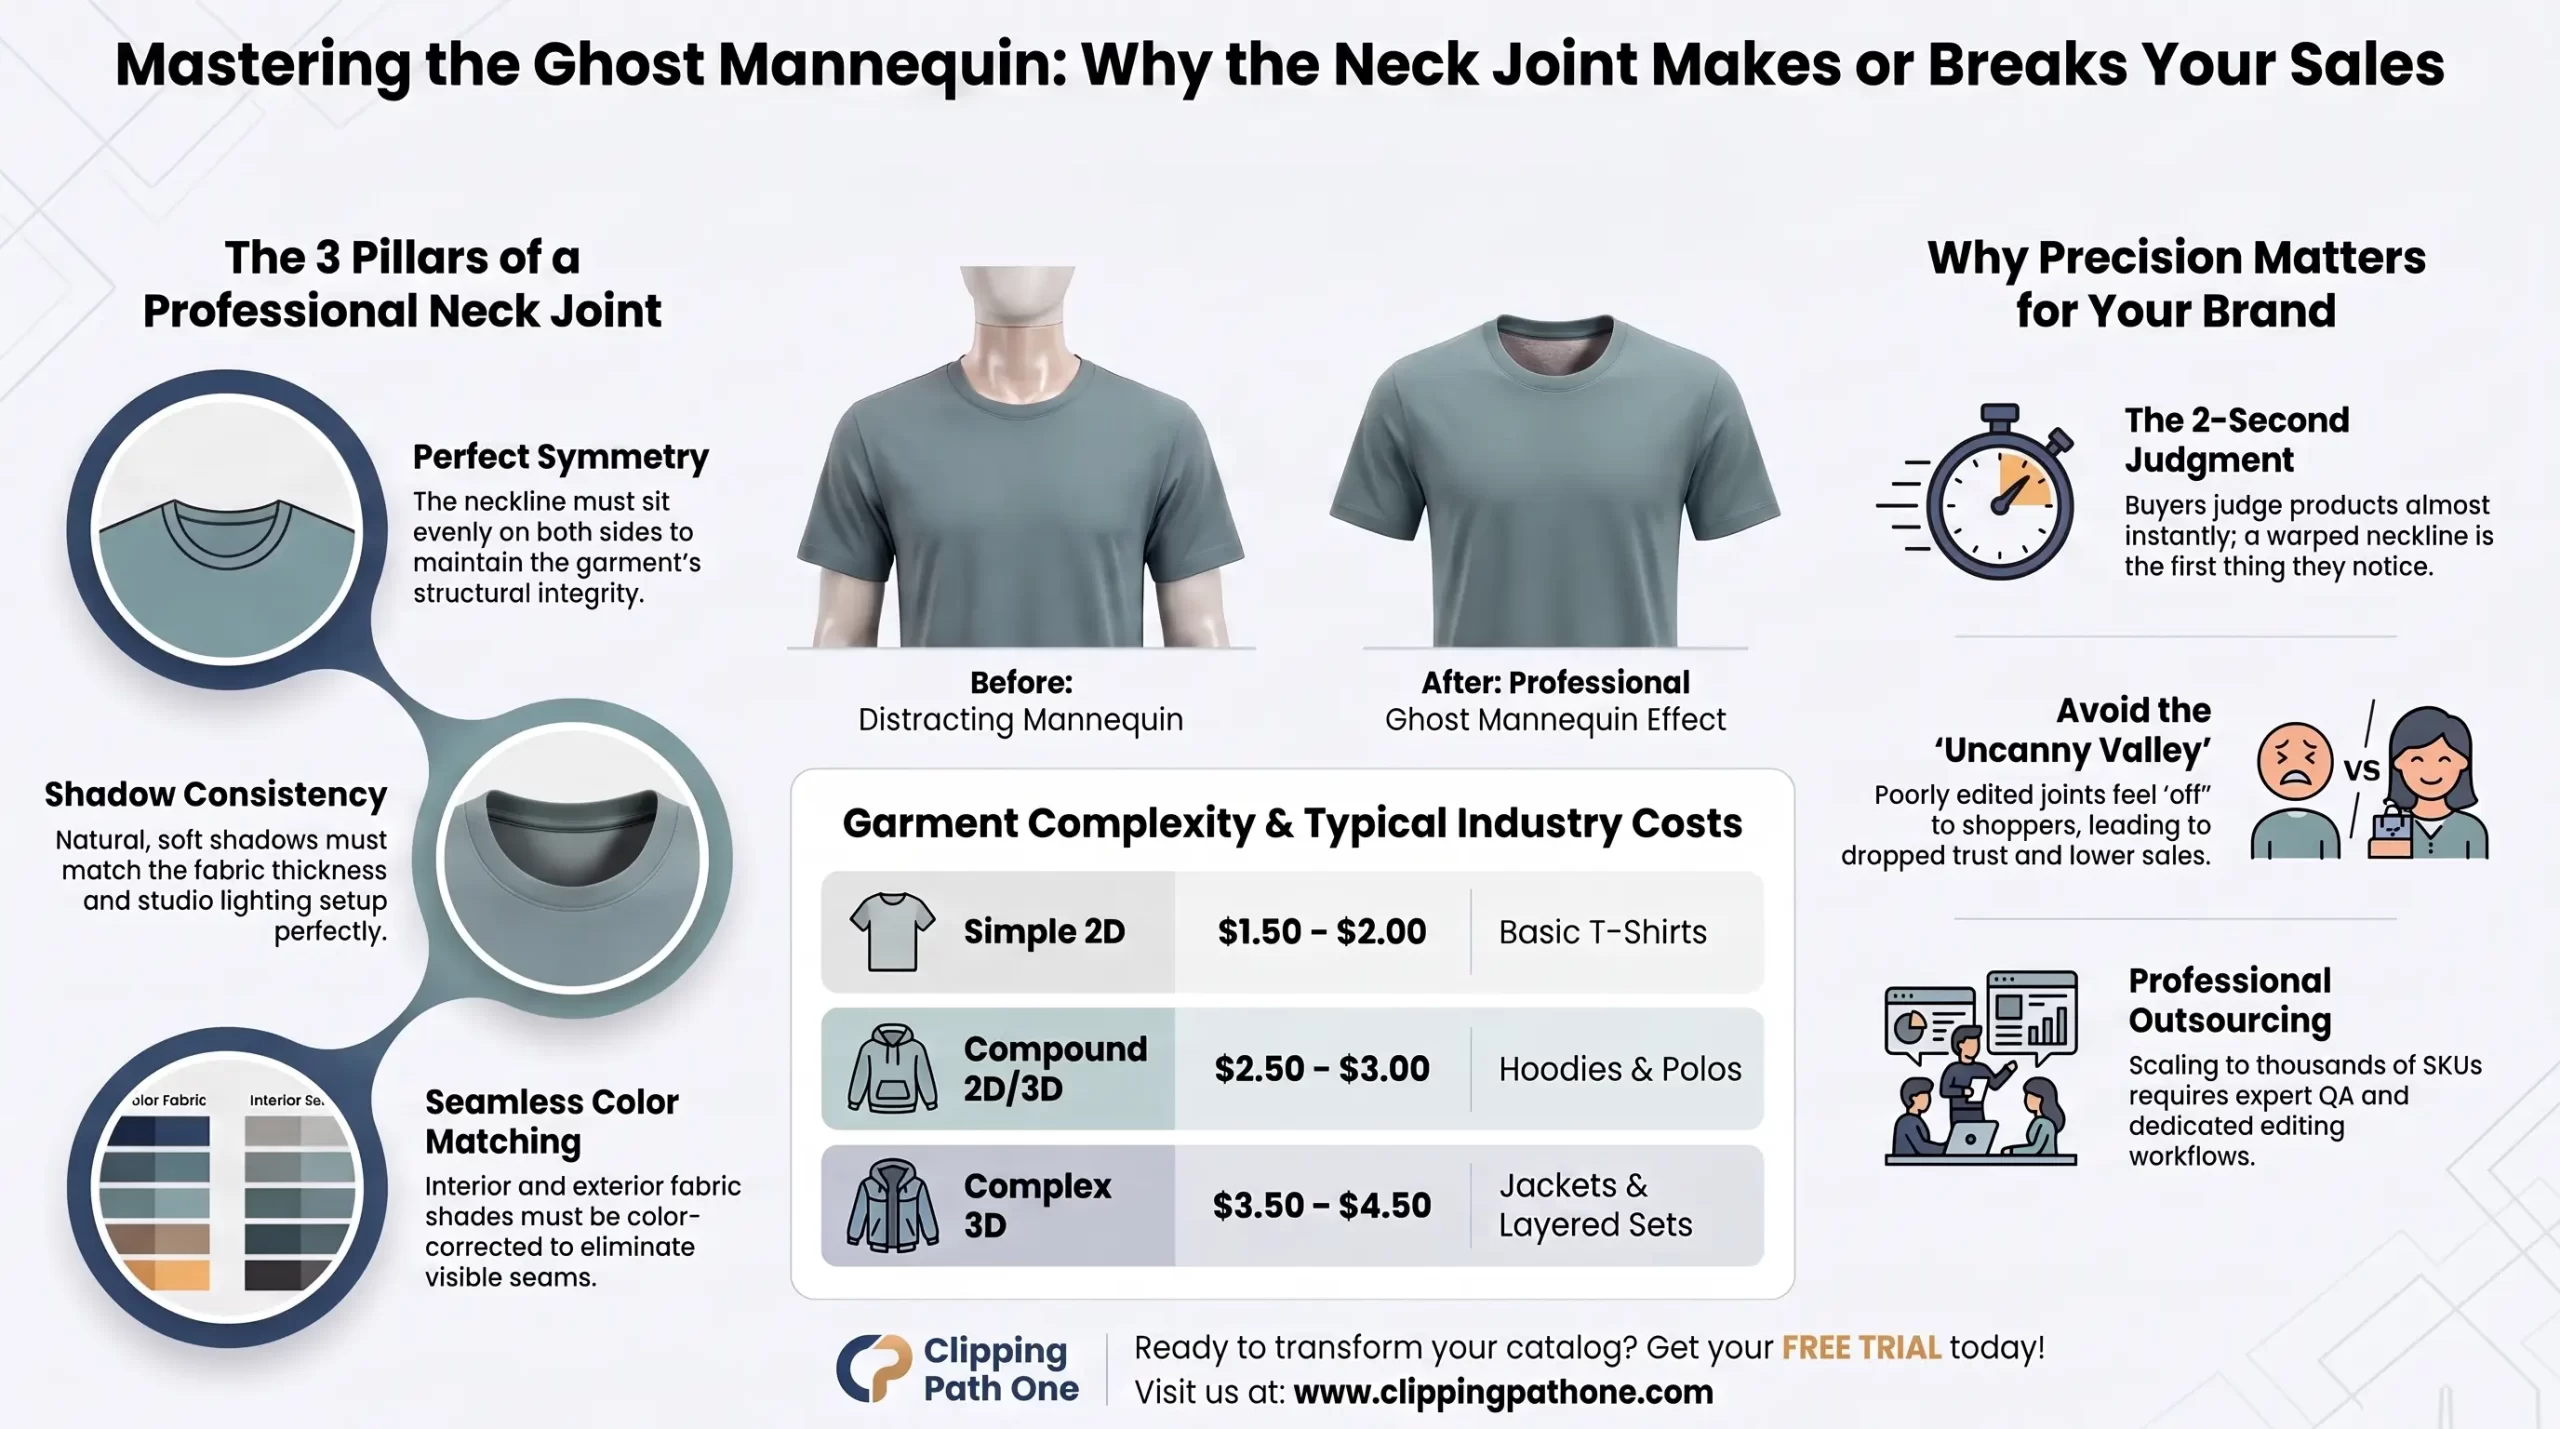
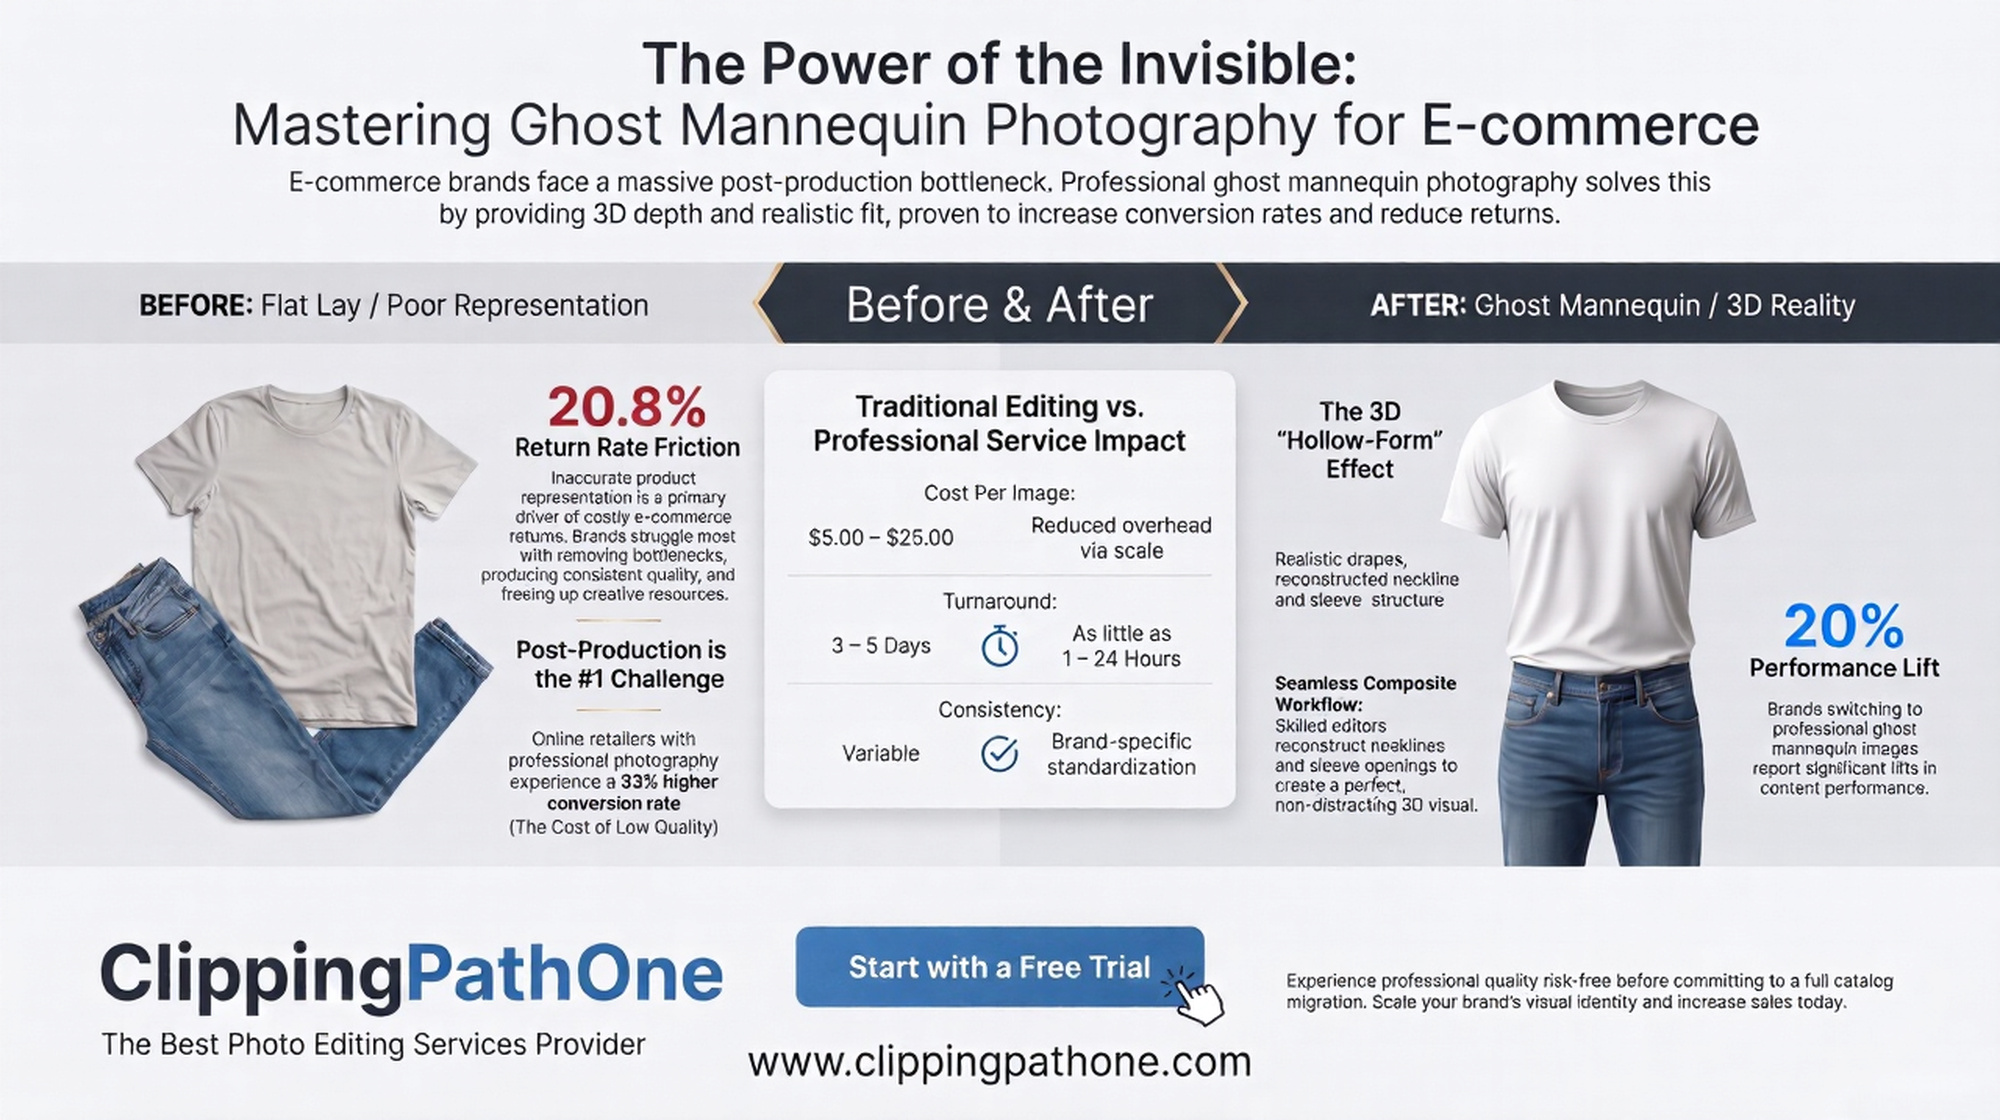
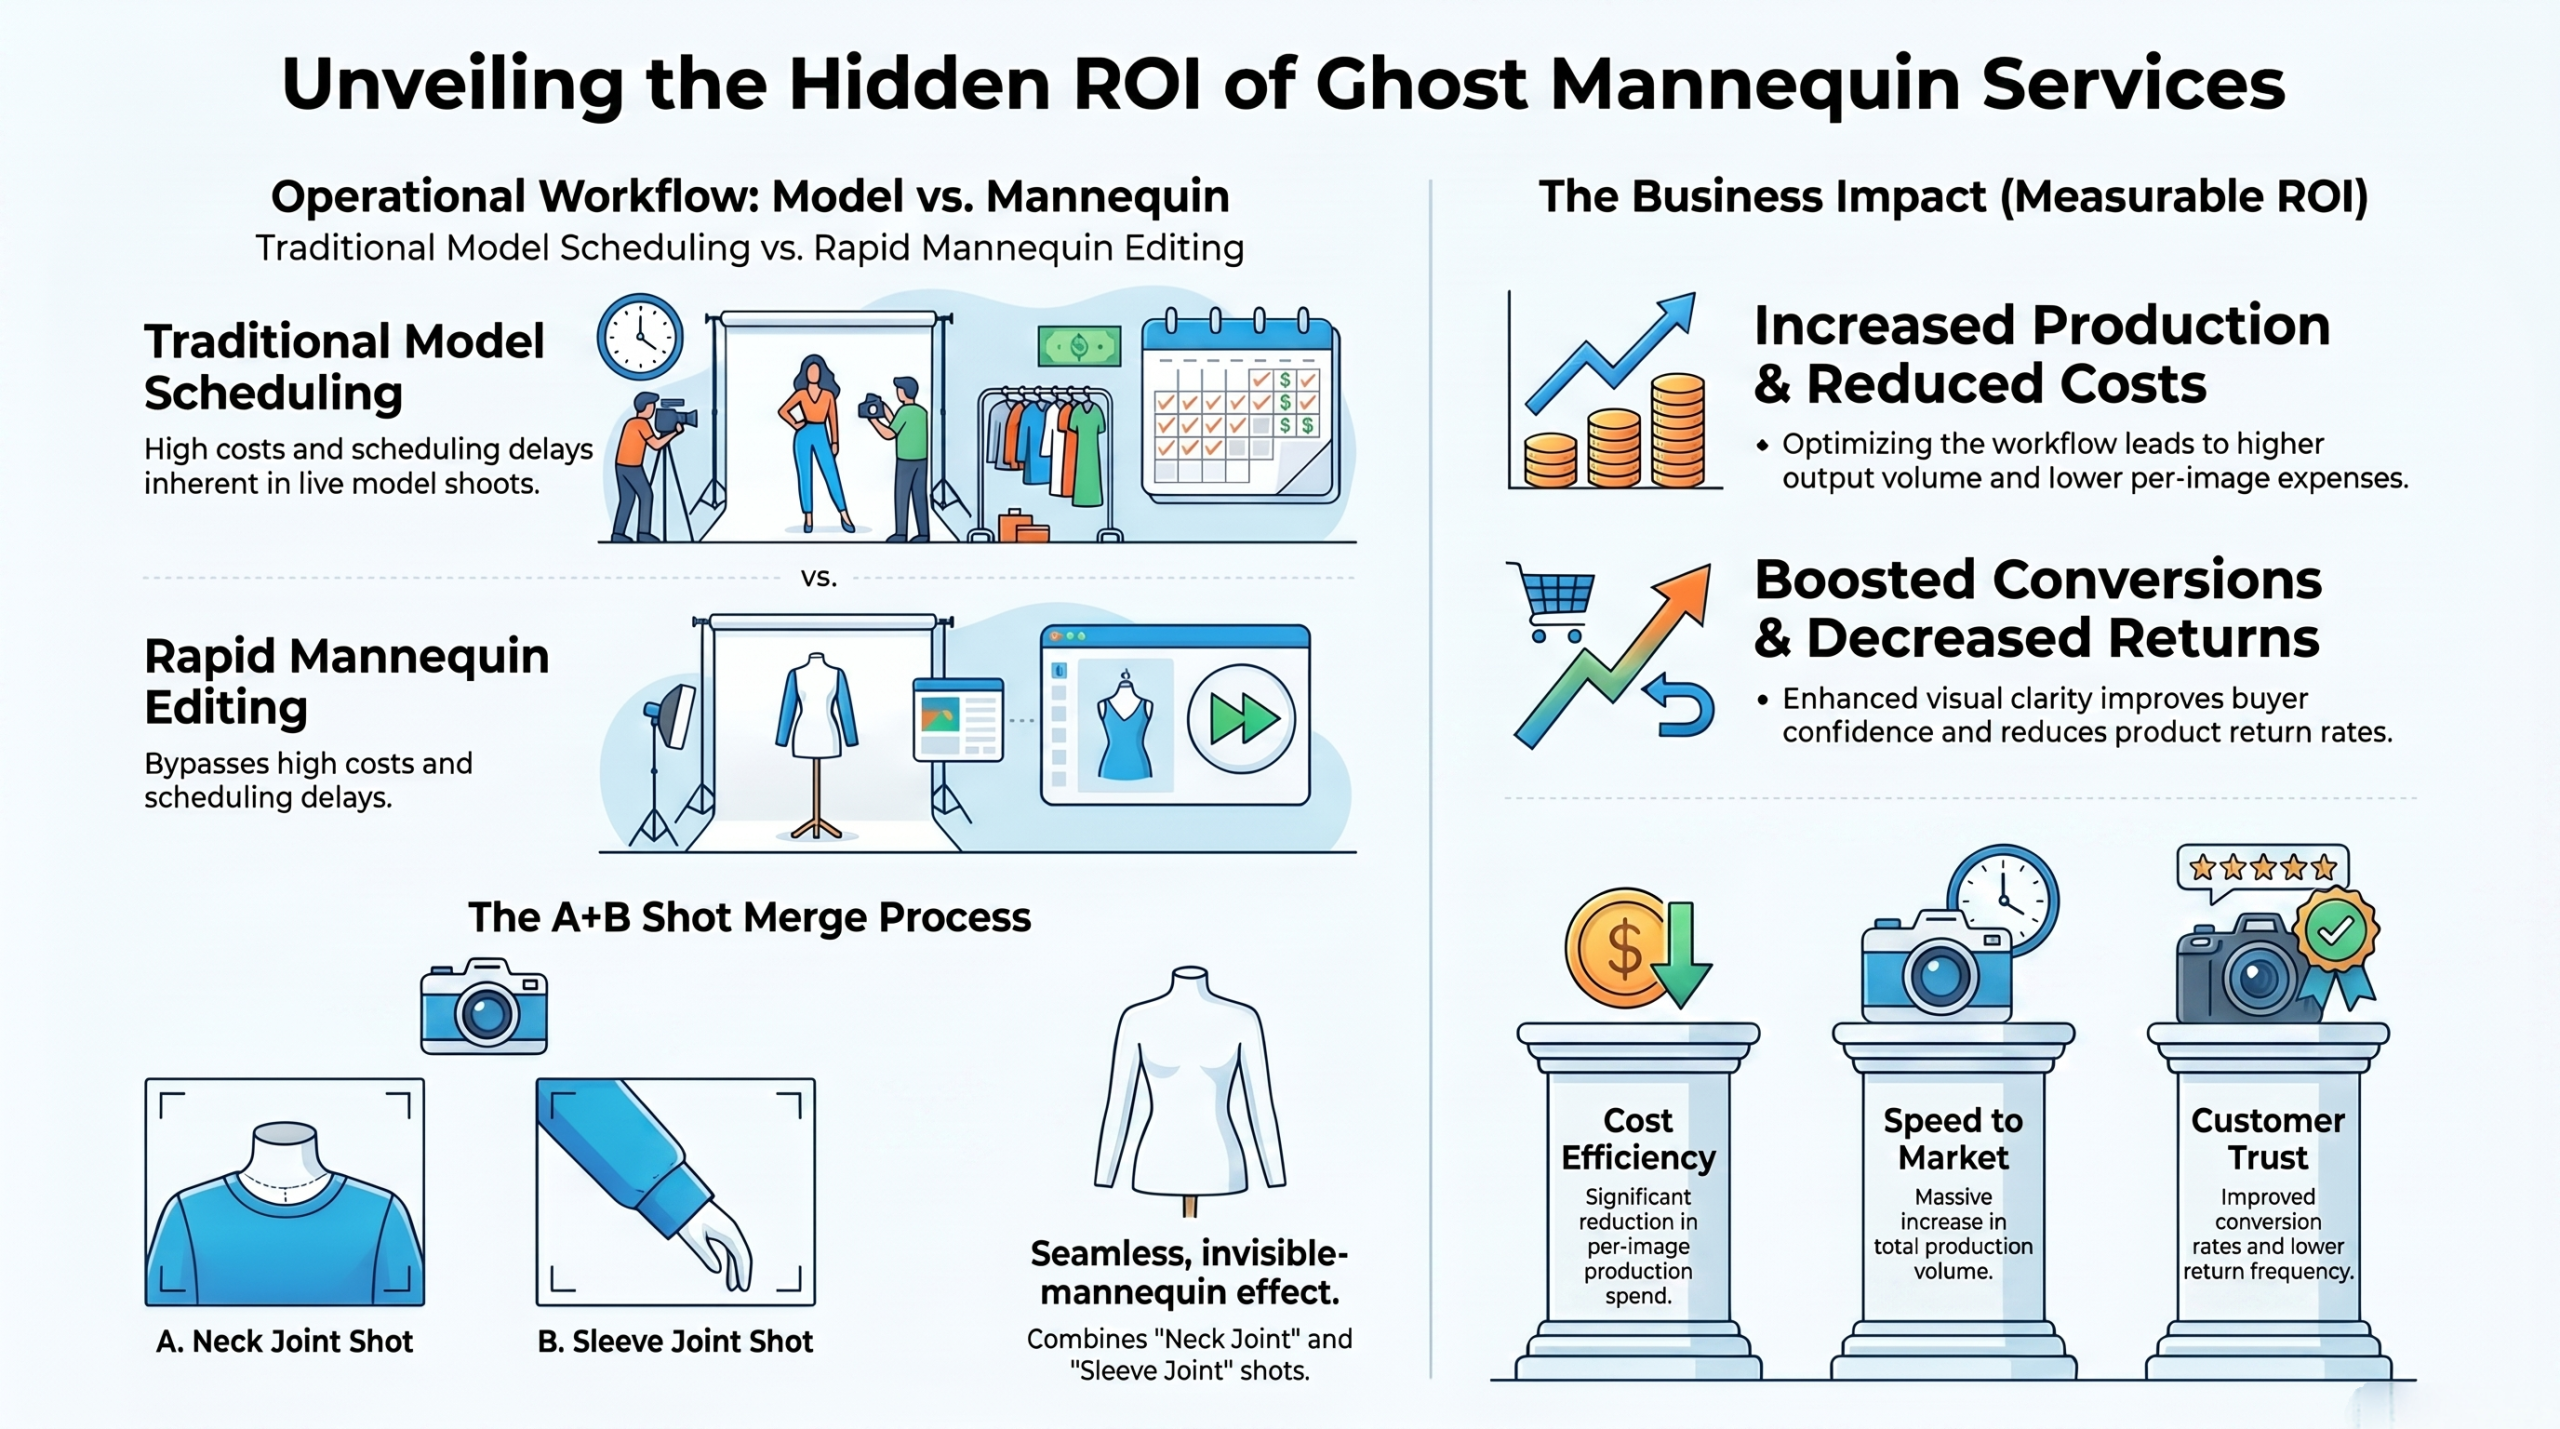
Ghost mannequin editing is the process of digitally removing the mannequin from a clothing photograph while keeping the garment’s natural shape intact. The final image shows the product as if it’s being worn by an invisible person.
Here’s why it matters: Mannequins create distracting reflections, odd skin tones, and unnatural shadow patterns. Remove them poorly, and you get flat, lifeless clothing. Remove them well, and the garment appears three-dimensional, inviting, and professional.
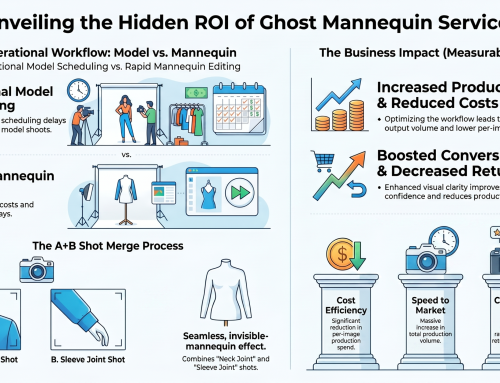
Most ghost mannequin photo editing services use a two-layer approach. One shot captures the outside of the garment on the mannequin. Another shot—or a careful masking technique—captures the inside neckline and sleeves. Merge them seamlessly, and the illusion is complete.
Question-Based H2 Headings (Optimized for PAA)
How Do You Fix Shadows in Ghost Mannequin Retouching?
Shadows are the number one giveaway of amateur editing. Too harsh, and the garment looks fake. Too soft, and it loses dimension.
The fix starts with observation. Natural shadows from studio lighting should fall softly along the armholes and neckline. When you remove the mannequin, those shadows often become disconnected—they point inward instead of outward, creating a dreaded “cutout” appearance.
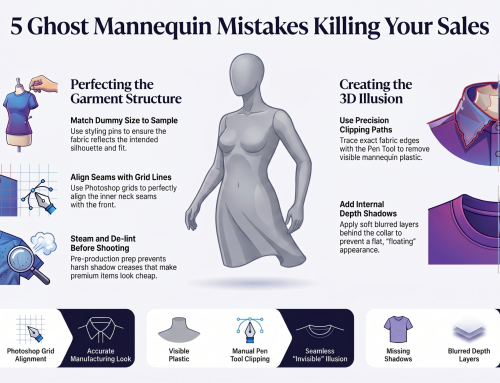
Use the clone stamp tool at 20-30% opacity to blend shadow edges. Better yet, create a separate shadow layer. Sample shadow colors from the original image, then paint them in where they naturally belong. For deep hollows, apply a subtle feather selection 3-5 pixels before masking. This softens the transition between the garment edge and the empty space behind it.
One pro trick: Flip your image horizontally. Your brain will instantly spot shadow inconsistencies that looked fine a moment ago. Fix those spots, flip back, and repeat until the lighting feels physically correct.
What Is the Correct Shape Fix for Ghost Mannequin Images?
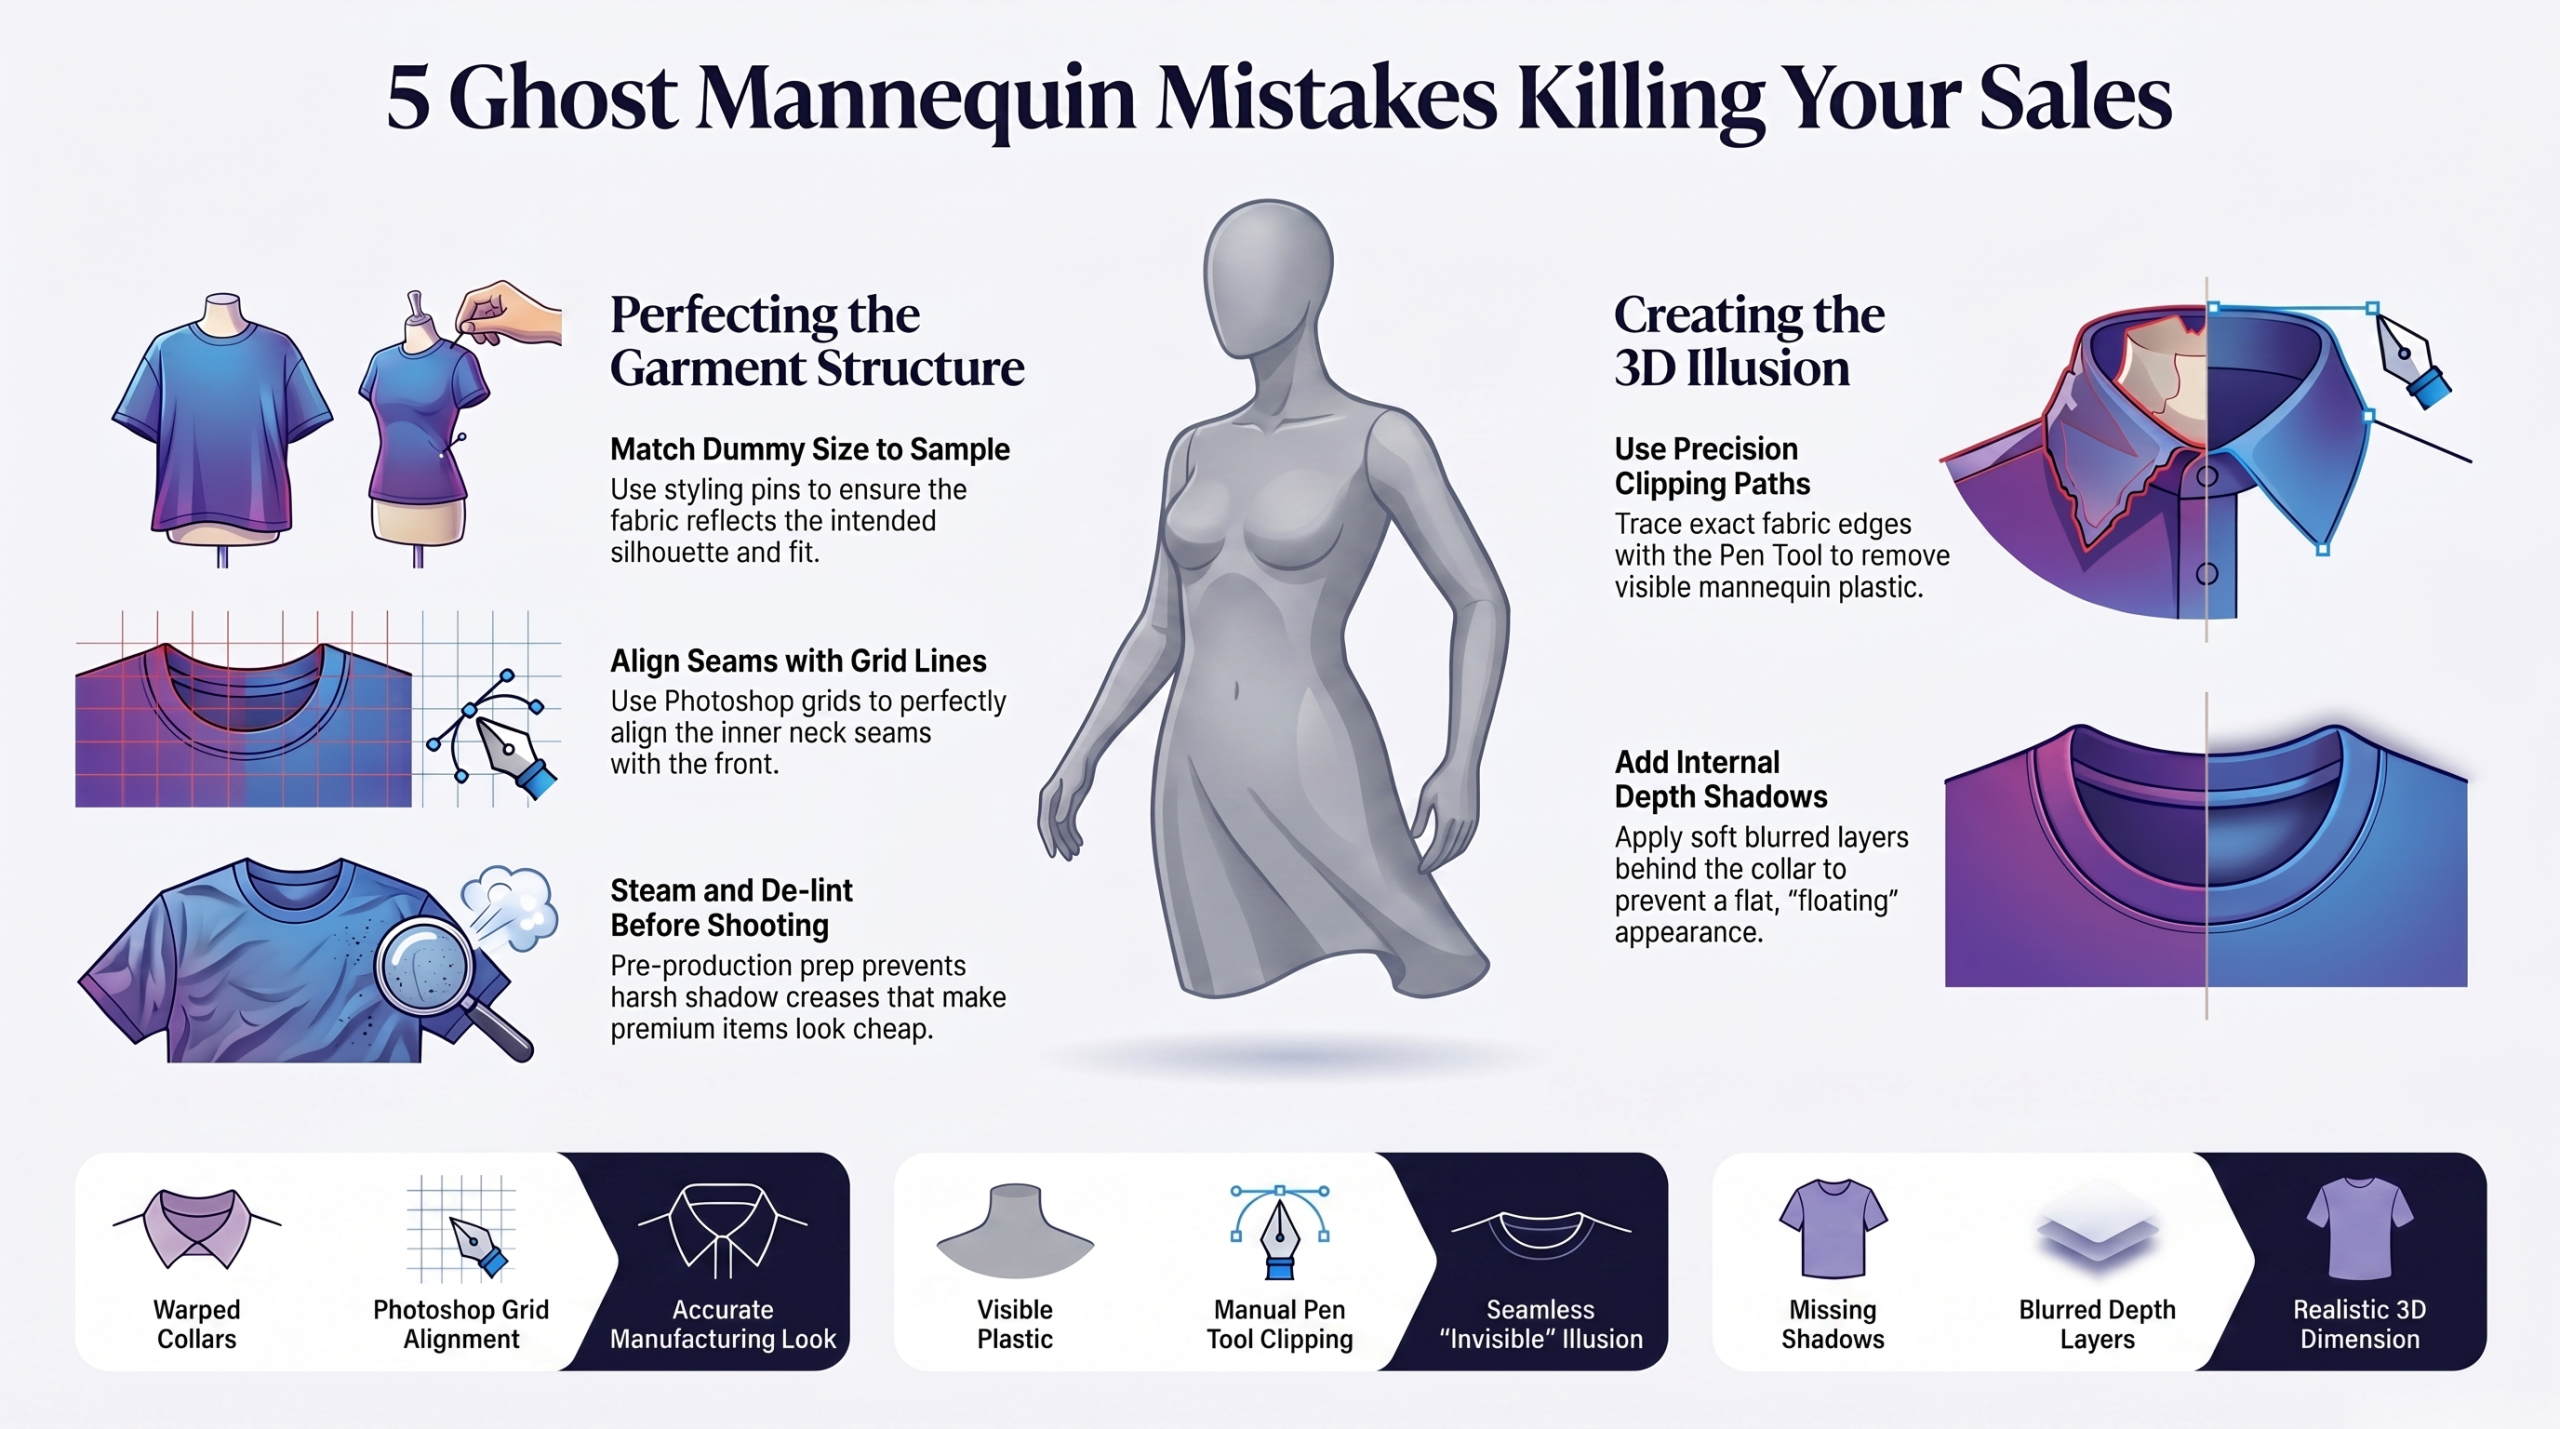
You’ve seen the disaster images on AliExpress. A beautiful sweater that suddenly turns into a wrinkled tube sock at the bottom. That’s shape loss from poor ghost mannequin Photoshop technique.
The rule is simple: preserve the original silhouette. Before you remove anything, duplicate your background layer. On the duplicate, use the pen tool to trace the garment’s outer edge with surgical precision. Convert this path to a selection, then create a layer mask.
Here’s where most people fail. They cut straight across the bottom hem or the armholes. Don’t. Follow every curve, every fold, every drape. The mannequin may be inside, but the garment’s natural resting shape should remain untouched.
For sleeves and necklines, the shape fix requires transform warping. After masking, use Edit > Transform > Warp to gently push the opening into a natural oval or circle. Human bodies aren’t perfect geometric shapes, and neither should your ghost mannequin results be.
How Do You Restore Texture After Ghost Mannequin Editing?
Texture loss happens when you over-blur or over-sharpen during the retouching process. The fabric looks like plastic. The weave disappears. Customers can’t trust what they can’t feel through the screen.
Frequency separation is your answer. This technique splits your image into two layers: a low-frequency layer for color and shadow, and a high-frequency layer for texture.
Set up a low-frequency layer using Filter > Blur > Gaussian Blur at 15-20 pixels. Create a high-frequency layer by applying Image > Apply Image with the low-frequency layer as the source. Set blending to Subtract, scale to 2, offset to 128. Now you can edit shadows and colors on the low layer without ever touching the fabric texture on the high layer.
For knitted fabrics, denim, or any textured material, this is non-negotiable. Skip it, and your ghost mannequin retouching will scream “fake” from a mile away.
What Is the Best Ghost Mannequin Retouching Software?
Not all software handles ghost mannequin editing equally. Here’s your comparison:
| Software | Best For | Learning Curve | AI Features | Price Range |
| Photoshop | Professional control | Steep | Neural Filters | $22.99/mo |
| GIMP | Free users | Moderate | Limited | Free |
| Capture One | High-volume studios | Moderate | No | $299 one-time |
| Pixelz | E-commerce automation | Low | Yes | Subscription |
| Clipping Magic | Quick background removal | Very low | Strong AI | $6/mo |
For serious work, Photoshop remains the gold standard. Its layer masks, frequency separation, and pen tool are unmatched. However, a new contender has emerged: ghost mannequin AI tools that automate 80% of the process.
Tools like Remove.bg and Photoroom now offer dedicated ghost mannequin modes. Upload a photo, click a button, and the AI identifies the garment, removes the mannequin, and fills the neckline. Is it perfect? Not yet. Complex shadows and fine textures still confuse AI. But for bulk processing simple items like t-shirts and hoodies, it’s shockingly good.
How Much Does Ghost Mannequin Retouching Cost?
Ghost mannequin retouching price varies wildly based on quality, volume, and turnaround time. Here’s what the market actually charges:
- Freelancers (Fiverr, Upwork):
- 0.50−3 per image
- Professional editing services:
- 2−8 per image
- US-based studios:
- 8−20 per image
- AI automated tools:
- 0.10−0.50 per image
Ghost mannequin retouching cost drops dramatically with volume. A single image might cost
10 from a quality provider. Send 500 images, and that number falls’ o1.50 each.
Red flags to avoid: Any service charging under $0.30 per image is almost certainly using automated tools without quality control. You’ll get hollows, flattened textures, and inconsistent lighting. The time you spend fixing their mistakes will cost you more than paying for quality upfront.
Is There a Good Ghost Mannequin App for Mobile?
Yes, but manage your expectations. Ghost mannequin retouching app options have improved significantly in the last year.
Photoroom (iOS/Android) leads the pack. Its ghost mannequin mode automatically detects necklines and sleeves, then fills them with realistic shadow gradients. The free version adds a watermark. The pro version ($6.99/mo) removes it and adds batch processing.
Picsart offers decent ghost mannequin editing app features through its “invisible mannequin” tool. It’s slower than Photoroom but handles complex shapes better.
Snapseed has no dedicated ghost mannequin feature, but its selective adjustments and healing tools can fix simple edits if you’re patient.
For professional results, use an app for quick previews only. Then send the final edits to a desktop with proper ghost mannequin Photoshop workflows.
Can AI Replace Manual Ghost Mannequin Retouching?
This question keeps retouchers up at night. The honest answer: Not yet, but it’s getting close.
Ghost mannequin AI free tools like Clipdrop and Adobe Firefly can remove a mannequin in seconds. They analyze thousands of training images to predict where seams should connect and how shadows should fall.
Here’s what AI still fails at:
- Sheer fabrics (see-through areas confuse the algorithm)
- Extreme close-ups (lack of context leads to warped shapes)
- Pattern matching (plaids and stripes misalign without careful masking)
- Custom lighting setups (AI assumes standard studio lighting)
The best workflow today combines AI with human expertise. Run your images through ghost mannequin AI for the initial removal. Then manually fix shadows, shape, and texture using frequency separation. This hybrid approach cuts editing time by 60% while maintaining professional quality.
Ghost mannequin AI free options exist, but they’re limited. Remove.bg gives you three free credits. Adobe Firefly offers 25 generative credits monthly. For serious volume, budget for paid tiers or invest in desktop software with AI plugins.
Practical Steps: Your 5-Minute Ghost Mannequin Workflow
Time is money. Here’s a streamlined process that delivers consistent results:
Step 1: Capture correctly. Photograph your garment on a mannequin that matches its size. Too loose, and the shape collapses. Too tight, and you’ll fight distorted seams later.
Step 2: Duplicate and mask. Create three layers: background, outside garment, inside fill. Use the pen tool for precise outer masks. Never use the magic wand for final edges.
Step 3: Fix shadows first. On a new layer, paint soft black at 10% opacity into hollow areas. Blend mode should be Multiply. Never use pure black—sample actual shadow colors from your image.
Step 4: Weld the shape. Where the outside layer meets the inside fill, use a soft brush on the layer mask at 50% opacity. Feather the transition. Hard edges kill the illusion.
Step 5: Restore texture. Apply frequency separation if you see any plastic-looking areas. The high-frequency layer alone will salvage most fabric details.
Step 6: Final inspection. Zoom to 100%. Check every edge, every shadow, every texture. Flip horizontally twice. Ask yourself: “Does this look physically real?”
Expert Opinion: What Pro Studios Do Differently
I interviewed Maria Chen, a senior retoucher who processes 2,000+ apparel images weekly for a major fashion retailer. Her insight changed how I think about ghost mannequin photography prep.
“Ninety percent of ghost mannequin problems start in the photography phase, not the editing phase,” she told me. “Editors can’t fix a shirt that was photographed on a mannequin two sizes too small. The fabric stretches unnaturally. Shadows point the wrong direction. Texture warps.”
Her recommendation: Use adjustable mannequins that match each garment’s actual measurements. Photograph with cross-polarized lighting to eliminate specular highlights. Capture one reference image with the garment on a hanger so editors understand the natural drape.
“For ghost mannequin photo editing services, we charge a premium because we photograph specifically for the edit. No surprises. No guesswork. Every shadow is intentional.”
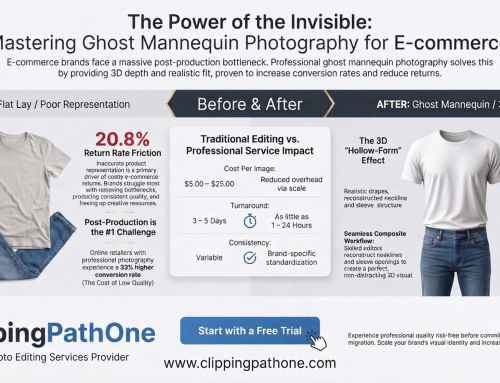
Benefits of Professional Ghost Mannequin Editing
Why invest time or money in this technique? The numbers speak for themselves:
- 48% higher conversion rates for products with ghost mannequin images vs. flat lay photos Baymard Institute, 2024
- 63% of online shoppers say image quality influences purchase decisions more than price
- Return rates drop 22% when customers can clearly see garment shape from multiple angles
Clean ghost mannequin editing also builds trust. When your product photos look professional, customers assume your shipping, customer service, and quality control follow the same standard. Sloppy images signal sloppy operations.
Common Mistakes to Avoid
Even experienced retouchers fall into these traps:
Over-sharpening the neckline. That crispy edge screams cut out. Keep a 1–2-pixel softness on all interior masks.
Forgetting sleeve openings. The neckline gets all the attention, but armholes and hems need the same shadow treatment. Inconsistent interior fills break the illusion instantly.
Using black for all shadows. Real shadows contain color. Sample the original shadow colors and use those. Add a touch of the garment’s color to your shadow brush for realism.
Relying only on AI. Ghost mannequin AI free tools produce decent first passes. But without manual shadow and texture fixes, they look obviously automated.
Conclusion
Ghost mannequin retouching separates amateur product photos from professional e-commerce imagery. Master the three pillars—shadows, shape, and texture—and your apparel images will convert browsers into buyers.
Start with proper ghost mannequin photography using correctly sized mannequins and intentional lighting. Edit with frequency separation for texture preservation. Fix shadows by sampling real colors, not default black. And remember: AI tools accelerate your workflow, but human eyes still catch the subtle details that make clothing look wearable.
Whether you’re editing in house at 0costperimageorhiring∗∗ghost mannequin editing services at5 per photo, the investment pays back in higher trust, lower returns, and products that truly sell themselves. Now go fix those hollow necklines. Your conversion rates will thank you.
