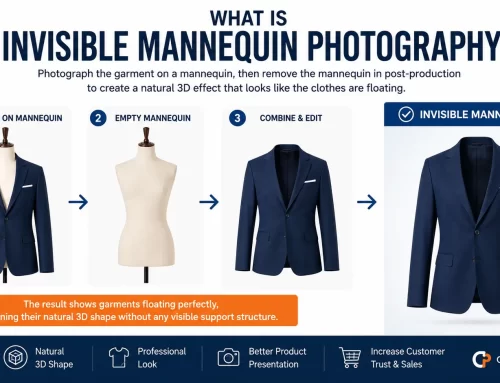
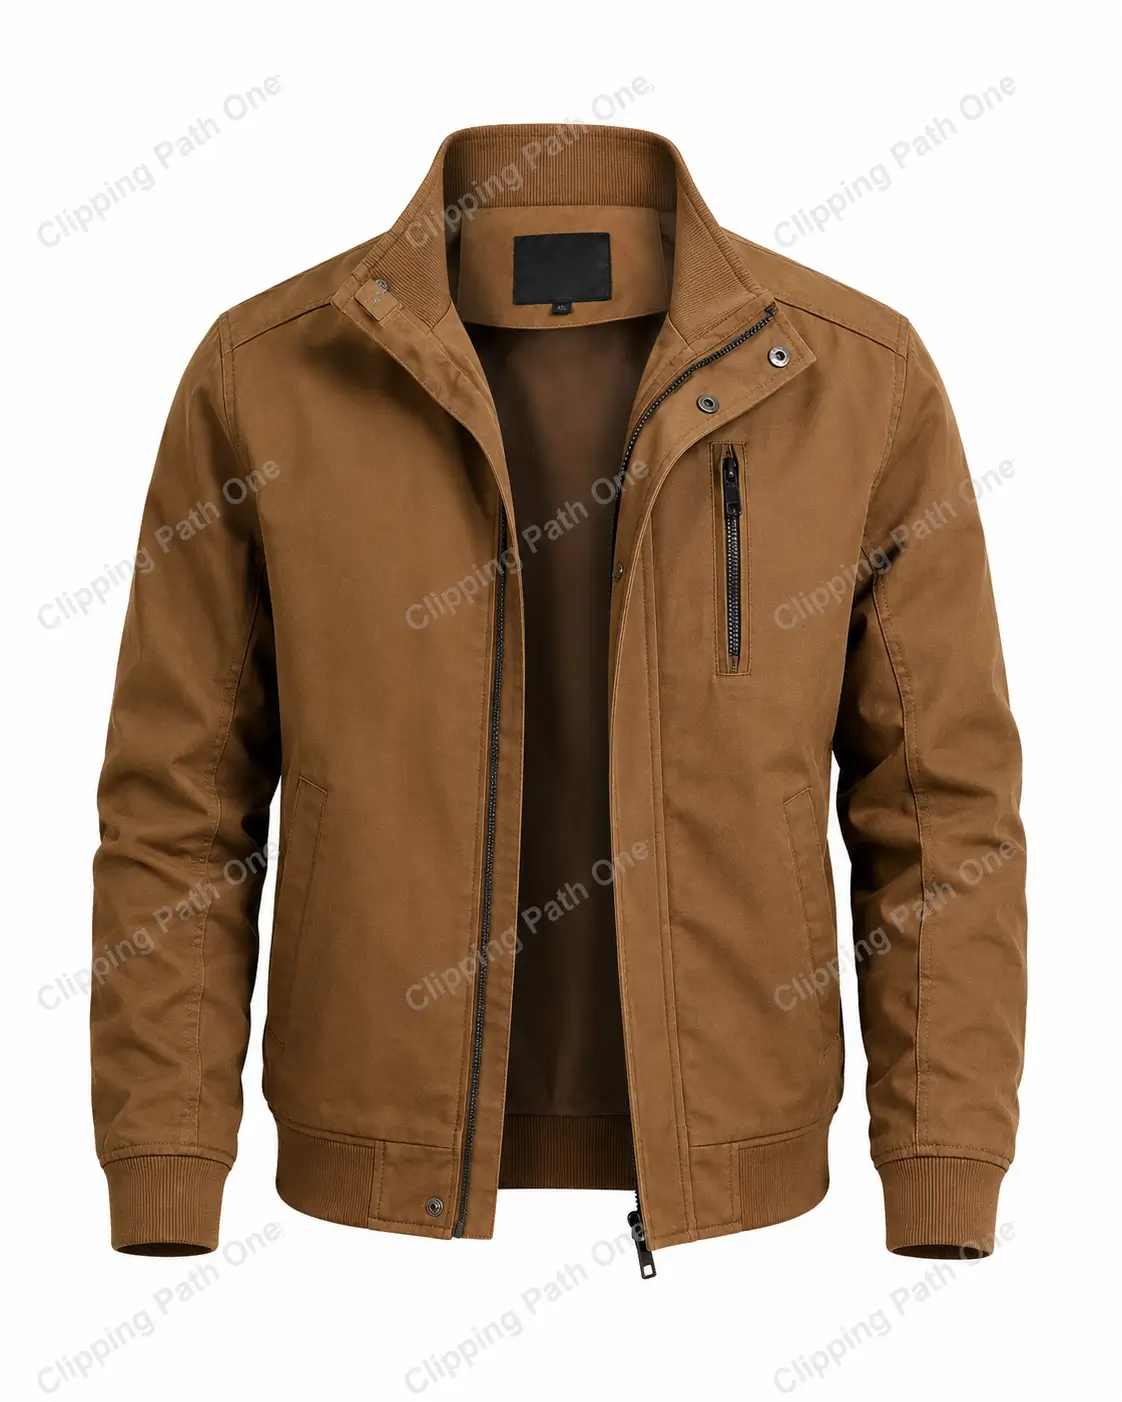
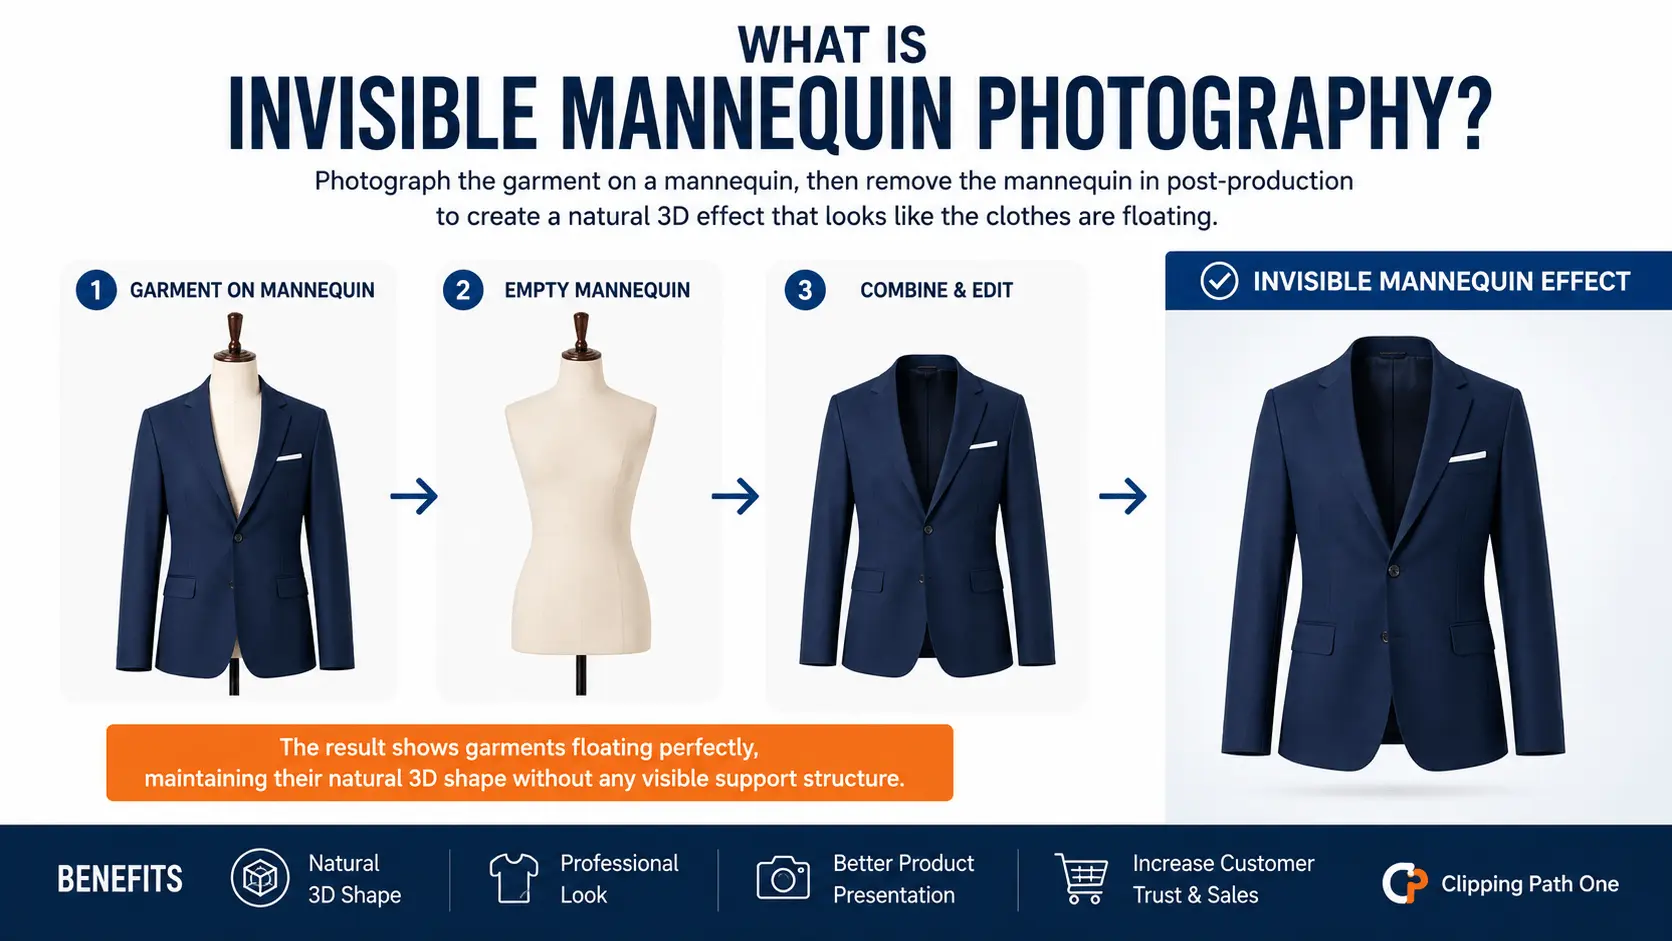
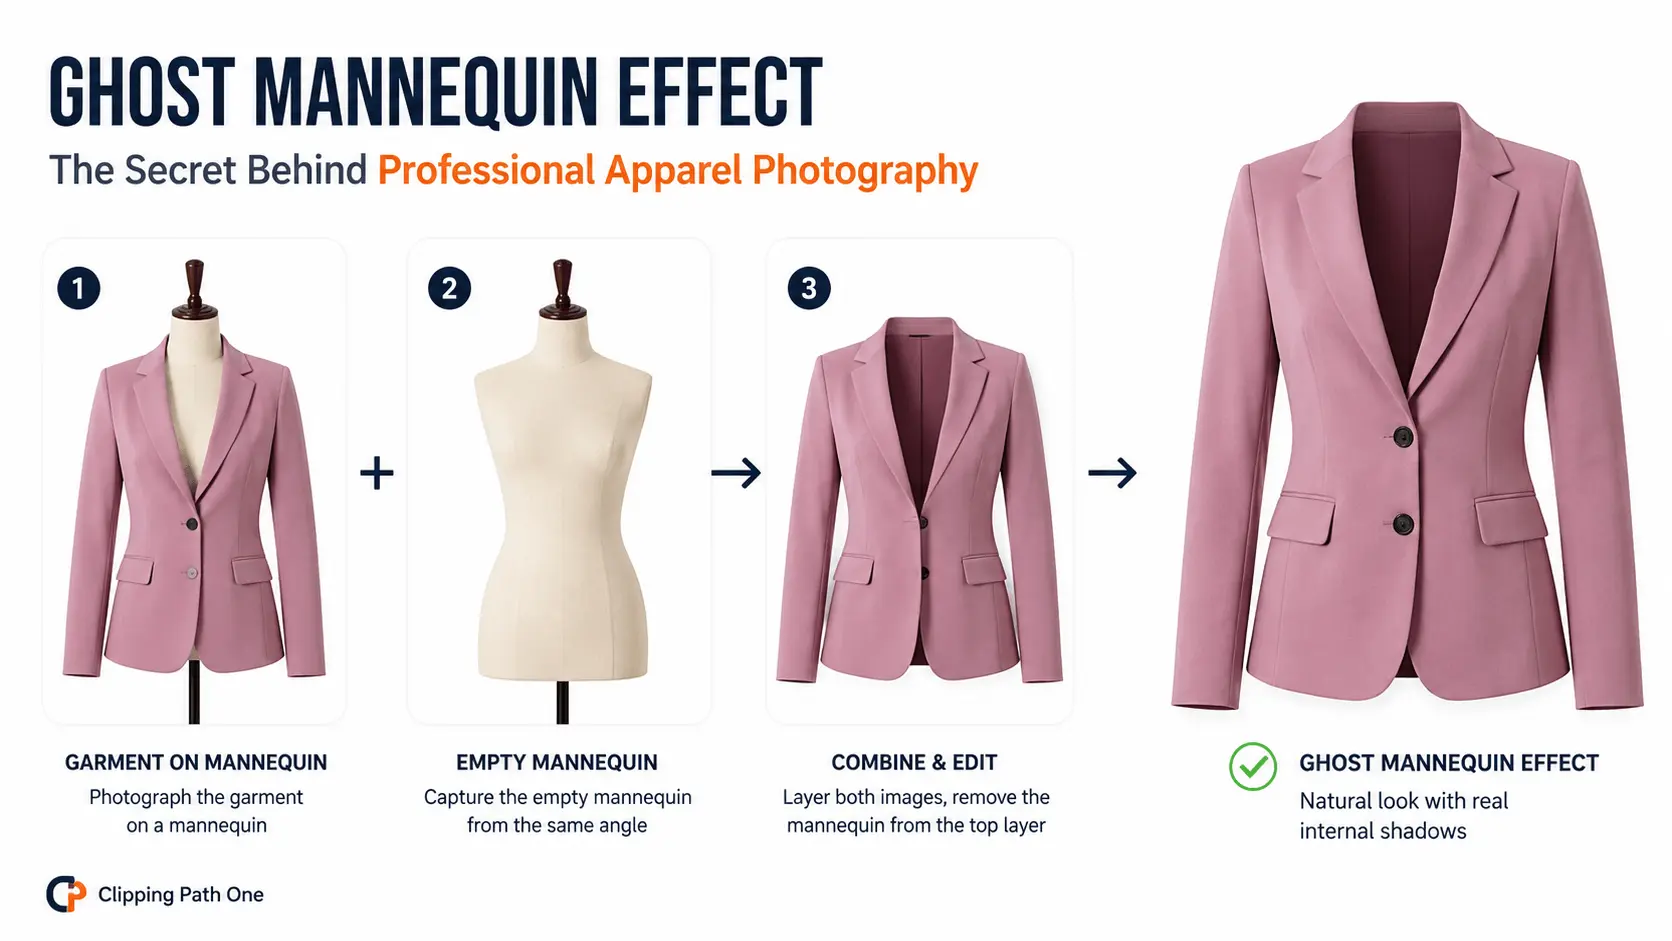
Ghost mannequin editing removes the mannequin from clothing photos while preserving the garment’s shape. For the neck joint, you paint soft shadows inside the collar to create depth. For apparel retouching, you clone out visible mannequin parts and blend edges. The result is a floating garment that looks natural and sellable.
Introduction: Why This Skill Changes Everything
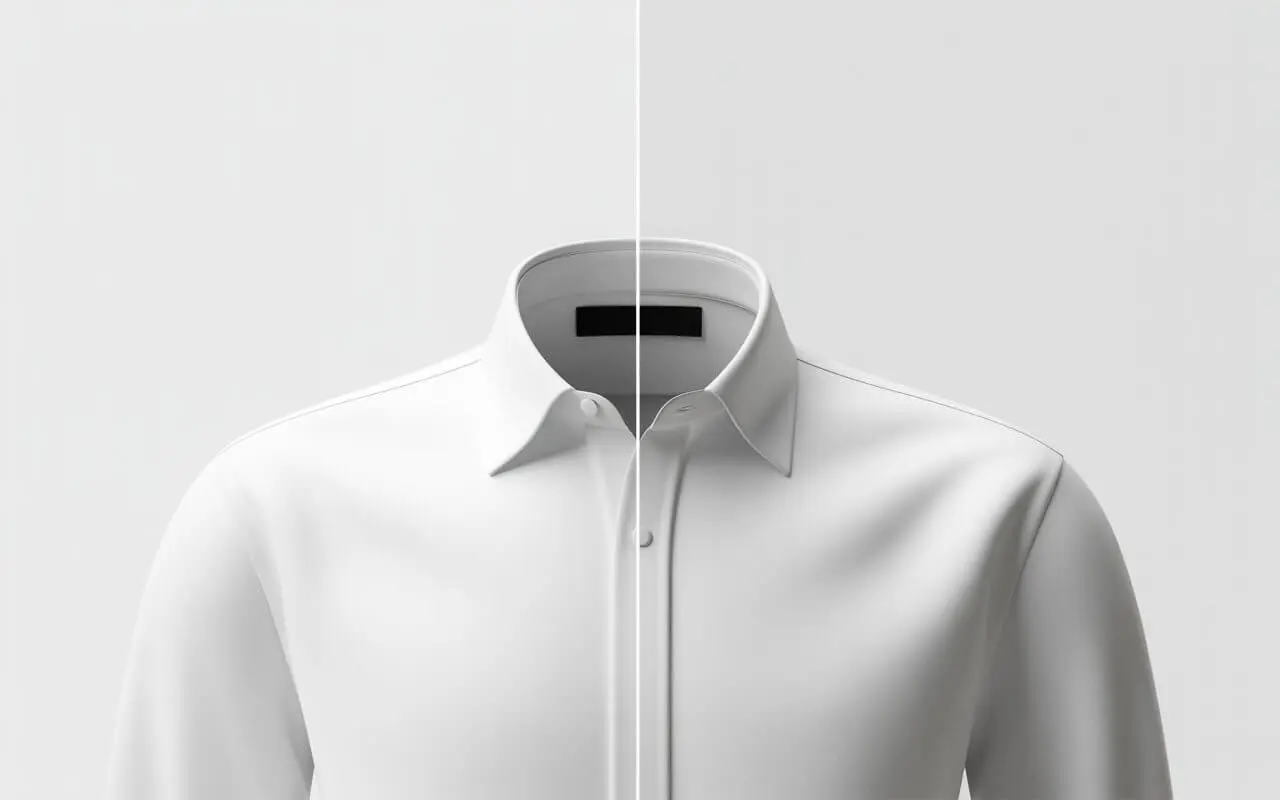
A bad neck joint ruins the illusion instantly.
You’ve seen it before. A shirt floats in mid-air, but the collar looks like a flat white hole. Something feels off. Customers can’t quite say why. But they click away.
That’s where ghost mannequin editing saves the day. This tutorial walks you through two critical techniques: neck joint retouching and general apparel cleanup. No theory. Just actionable steps you can apply today.
Ready to make mannequins disappear? Let’s dive in.
What Exactly Is Ghost Mannequin Editing?
Ghost mannequin editing is the process of removing a display form from product photos while keeping the clothing’s three-dimensional structure intact.
The ghost mannequin effect photo editing relies on layer masks, cloning, and shadow painting. You don’t need expensive software. But you do need precision.
Here’s the simple breakdown:
- Cut out the mannequin body
- Preserve the garment’s outline
- Add realistic depth inside openings neck, sleeves, hem
- Clean up any leftover artifacts
Sounds easy. But the neck joint? That’s where beginners stumble.
What Is the Neck Joint in Ghost Mannequin Editing?
The neck joint is the transition zone between the collar opening and the inside of the garment.
Think of it as a tunnel entrance. If the inside looks like a flat white void, your brain rejects it. If it shows soft, dark gradients, your brain accepts it as a real cavity.
Ghost mannequin photo editing without proper neck joint work looks cheap. With it? Your products look premium.
What Software Do You Need for Ghost Mannequin Editing?
You have options. Let me rank them.
| Software | Best for | Cost | Learning Curve |
| Photoshop | Professional control | $22.99/mo | Moderate |
| GIMP | Free & capable | $0 | Steep |
| Affinity Photo | One-time purchase ($69.99) | One-time | Moderate |
| Ghost mannequin app e.g., PhotoRoom | Speed & simplicity | Free + $9.99/mo | Very low |
| Ghost mannequin editing online free tools (e.g., Remove.bg) | Quick tests | Free with limits | Minimal |
My recommendation: Learn with GIMP or a ghost mannequin app free version. Then upgrade to Photoshop when you need batch processing or advanced masking.
How to Do Ghost Mannequin Neck Joint Retouching (Step by Step)
Let’s get hands-on. I’ll assume you’re using Photoshop, but the same principles apply to GIMP or Affinity.
Step 1: Prepare Your Layers
Open your garment photo. Duplicate the background layer. Hide the original.
Add a new layer above. Name it “Neck Shadow.”
Step 2: Select the Neck Opening
Use the Pen Tool or Lasso for rough edges. Trace the inside of the collar. Don’t include the external fabric.
Feather your selection by 2-3 pixels. Soft edges look natural.
Step 3: Paint the Shadow
Switch to the Brush Tool. Use a soft round brush. Color: black.
Set opacity to 15%. Flow to 25%.
Paint along the inner edge of the neck opening. Focus on the area closest to the collar fold. The shadow should be darkest near the edge and fade toward the center.
Pro tip: Vary brush size. Small brush for tight corners. Larger brush for broad gradients.
Step 4: Add a Second Shadow Layer
Create another layer. Name it “Neck Deep.”
Use a larger brush. Opacity 8%. Paint a wider, fainter shadow deeper inside the opening.
This mimics ambient occlusion. Light can’t reach the bottom of a real collar. Your edit should reflect that.
Step 5: Blend and Review
Zoom to 100%. Check your work. Does the neck look hollow? Or does it look like a painted cutout?
Adjust opacity until it feels right. For white shirts, use dark gray not pure black. For black shirts, use very dark gray with a hint of the fabric color.
How to Retouch the Rest of the Apparel Beyond the Neck
The neck joint is critical. But don’t ignore the rest.
Removing Mannequin Clips and Stands
Many mannequins have visible metal rods or plastic clips. Here’s how to erase them:
- Select the Clone Stamp Tool (S)
- Alt-click on a clean fabric area nearby
- Paint over the clip
- Use a soft brush at 50% hardness
- Repeat until the clip disappears
Watch out for repeating patterns. Clone from different source points to avoid obvious duplication.
Fixing Sleeve Openings
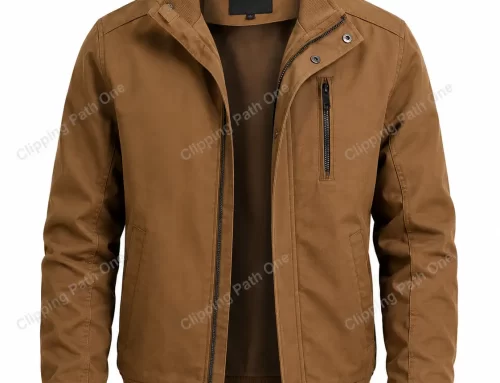
Same principle as the neck. Paint soft shadows inside armholes. But pay attention to garment type:
- T-shirts: Light shadow, faint gradient
- Jackets: Darker shadow, more pronounced
- Sheer blouses: Very subtle shadow 15% opacity max
Smoothing Edges
After cutting out the mannequin, edges can look jagged. Fix them:
- Select the garment layer
- Go to Select > Modify > Contract (1 pixel)
- Feather by 0.5 pixels
- Inverse selection and delete
This cleans up stray background pixels.
Ghost Mannequin AI: Can It Replace Manual Editing?
Ghost mannequin AI tools have improved fast. Services like Claid.ai and Pixelcut now offer automated ghost mannequin photo editing services.
Here’s what AI does well:
- Basic mannequin removal
- Consistent white backgrounds
- Fast turnaround seconds per image
But here’s where ghost mannequin AI free or paid versions still fail:
- Neck joint shadows that match the garment’s lighting
- Complex fabrics lace, sequins, leather)
- Multiple layers hoodies with linings
The honest truth: Use ghost mannequin AI for high-volume, simple apparel. Use human editing for premium products. Or combine both: AI first pass, then manual neck joint refinement.
Ghost Mannequin Editing Online Free: Top Tools to Test
Want to try without installing anything? These ghost mannequins editing online free options work:
| Tool | Free Tier Limits | Best For |
| Remove.bg | 500x500px output, watermark | Quick tests |
| PhotoRoom web | 3 free exports per week | Basic edits |
| Claid.ai | 10 free credits | Batch preview |
| Pixelcut | 5 free edits | Mobile-style editing |
Warning: None of these do true neck joint retouching. They remove the mannequin but leave flat openings. You’ll still need manual shadow painting.
What to Look for in Ghost Mannequin Editing Services If You Outsource
Not everyone wants to edit themselves. If you’re searching for ghost mannequin editing services or outsource ghost mannequin image editing services, here’s my checklist.
Red Flags
❌ Prices under $1.50 per image usually automated or offshore with poor QC
❌ No sample of neck joint work in their portfolio
❌ Unlimited revisions promise means rushed first attempts
❌ No color correction included
Green Lights
✅ Before/after showing internal shadows
✅ Specific experience with your category e.g., outerwear, lingerie
✅ Tiered pricing with volume discounts
✅ Free test edit offered
Average pricing: Professional ghost mannequin photo editing services range from
3to8 per image. For 500+ images monthly, expect
Common Ghost Mannequin Editing Mistakes and How to Fix Them
I’ve reviewed thousands of edits. These errors pop up constantly.
Mistake 1: No Shadow Inside the Neck
Problem: The collar looks like a flat white ellipse.
Fix: Add a soft black gradient on a separate layer. Opacity 15-25%.
Mistake 2: Shadow Too Dark or Too Sharp
Problem: The neck looks like a black hole.
Fix: Use dark gray, not pure black. Feather your selection. Reduce opacity to 10-15%.
Mistake 3: Visible Mannequin Texture Remains
Problem: You see a faint skin-tone pattern inside the sleeve.
Fix: Zoom in. Use clone stamp with a soft brush. Sample from clean fabric inside the same opening.
Mistake 4: Jagged Cutout Edges
Problem: The garment outline looks pixelated or wavy.
Fix: Refine edge with a 0.5px feather. Or use the Pen Tool for smooth vector masks.
Expert Opinion: A Professional Retoucher’s Advice
I spoke with David Kwan, a product image retoucher with 12 years of experience working for brands like Uniqlo and ASOS.
“Most beginners underestimate the neck joint. They spend 90% of their time removing the mannequin body and 10% on shadows. Flip that ratio. Spend 10% on removal and 90% on realistic depth. Your conversion rate will thank you.”
His specific neck joint workflow:
- Always shoot a reference photo of the garments inside lining
- Use that lining texture as a source for cloning inside the neck
- Add three shadow layers: edge shadow (15% black), mid-depth (8% black), and deep cavity (4% black with soft blur)
Result: The neck looks so real that customers never notice it’s edited. That’s the goal.
Ghost Mannequin Editing Software: Which One Is Right for You?
Let me simplify your choice.
Choose Photoshop if: You do 50+ edits weekly. You need batch actions. You want the best masking tools.
Choose GIMP if: Your budget is zero. You’re willing to learn a less intuitive interface. You have time to watch tutorials.
Choose a ghost mannequin app if: You edit on mobile. You need speed over precision. You sell simple t-shirts and hoodies.
Choose professional ghost mannequin editing services if: You sell 200+ products monthly. Your time is worth more than $20/hour. You want consistent, deliverable-quality results.
How to Do Ghost Mannequin Photography to Make Editing Easier
Great editing starts at the photoshoot. Follow these ghost mannequin photography tips:
- Use a skin-toned mannequin easier to mask than black or white
- Light evenly with two soft boxes no harsh shadows
- Shoot the empty mannequin from the exact same position
- For tricky neck joints, take an inside-out shot of the collar
- Always shoot RAW more shadow detail to work with
Remember: A well-lit photo needs 70% less editing time.
FAQ: Ghost Mannequin Editing
What is the ghost mannequin effect in photo editing?
The ghost mannequin effect makes clothing appear to float while keeping its 3D shape. Editors remove the mannequin and add realistic shadows inside neck and sleeve openings.
Can I do ghost mannequin editing online for free?
Yes, but with limits. Tools like Remove.bg and PhotoRoom offer ghost mannequin editing online free tiers. However, free versions lack neck joint retouching you’ll need manual editing for professional results.
How long does ghost mannequin editing take per image?
Manual editing: 3-10 minutes per image depending on complexity. Ghost mannequin AI tools: 5-10 seconds. Professional services: 24-48 hours turnaround for batches.
What’s the best ghost mannequin editing software for beginners?
Start with PhotoRoom mobile app or GIMP desktop, free. Both have learning resources. Avoid jumping straight to Photoshop unless you’re already familiar with layer masks.
How much do outsourced ghost mannequin image editing services cost?
Pricing ranges from
2to8 per image. Volume discounts apply at 100+ images monthly. Always request a free test edit before committing.
Conclusion: Master the Neck Joint, Master Ghost Mannequin Editing
Ghost mannequin editing isn’t complicated. But it demands attention to detail.
The neck joint is your make-or-break moment. Paint those shadows too dark, and the garment looks weird. Skip them entirely, and it looks fake. Get them just right, and your products look like they belong in a premium catalog.
Your homework this week:
- Shoot one garment with proper lighting
- Edit out the mannequin using GIMP or Photoshop trial
- Spend 15 minutes perfecting the neck joint alone
- Compare your result to a professional example
