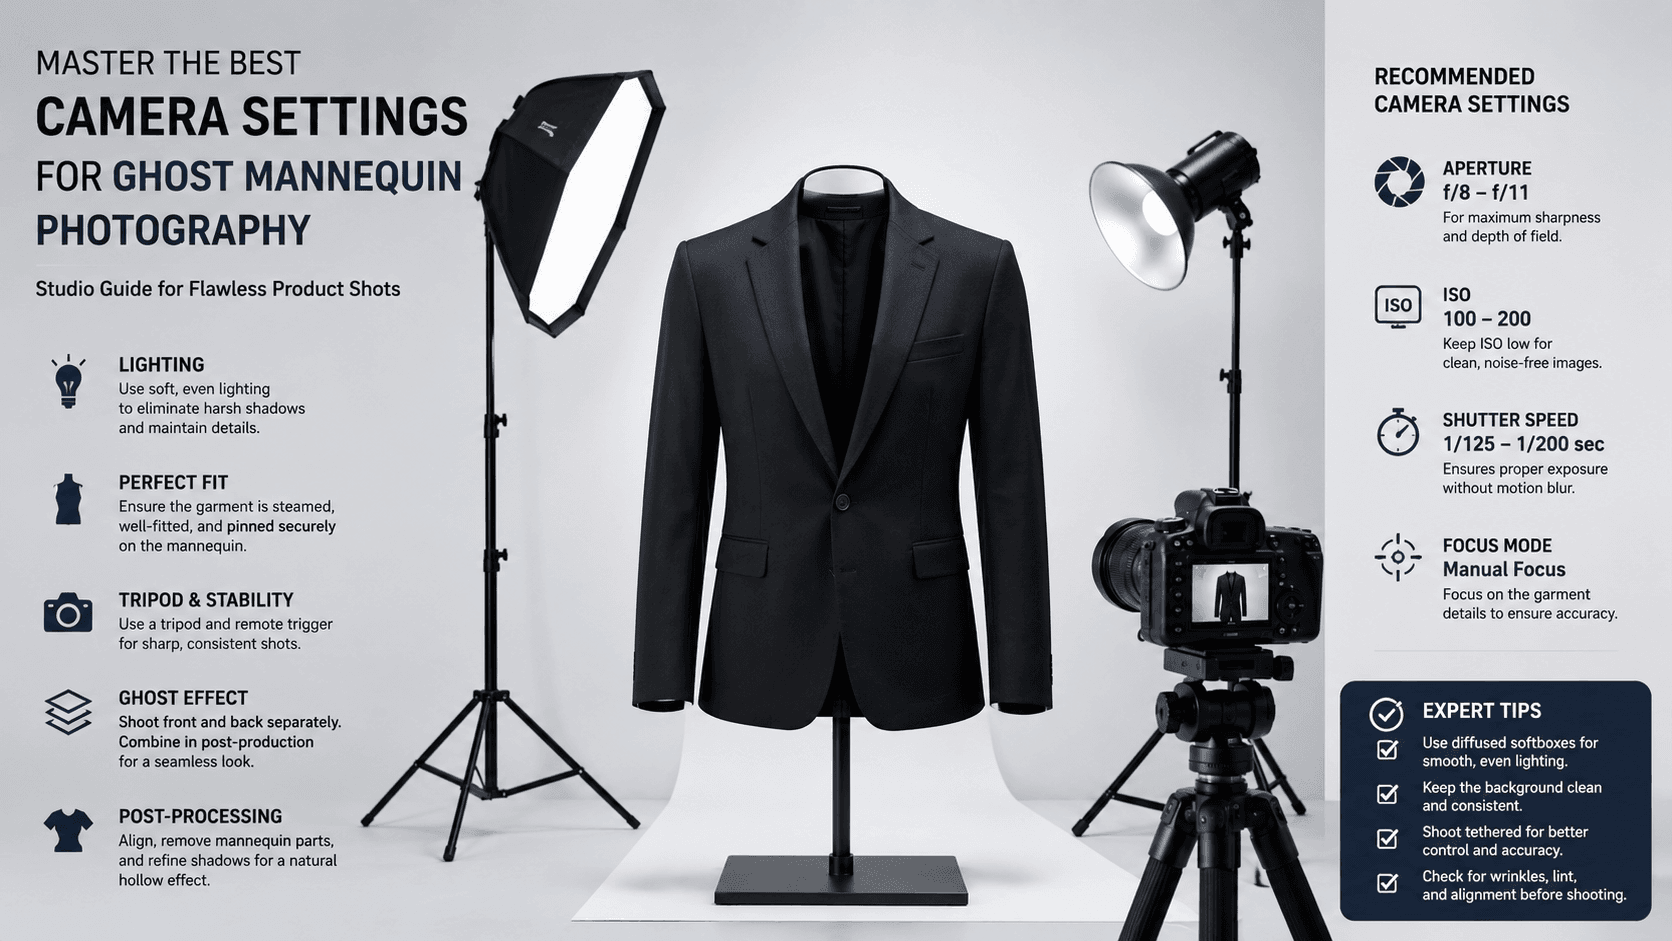
Best Camera Settings for Ghost Mannequin Photography
For flawless ghost mannequin photography, set your camera to f/8–f/11 aperture, ISO 100, and shutter speed 1/125–1/160 second. Use manual mode, daylight white balance (5200K), and a 50–100mm lens. These camera settings for ghost mannequin photography eliminate noise while keeping every seam and shadow perfectly crisp.
Introduction
Let’s be honest. Ghost mannequin photography can feel like a dark art. You want that floating, hollow look—the one where clothing appears to wear itself, seams invisible, shape perfect. But without the right camera settings for ghost mannequin photography, you’ll fight blur, noise, and mismatched exposures until you want to throw your tripod across the room.
Here’s the truth: getting it right isn’t about expensive gear. It’s about precision. A
300camerawithperfectsettingsbeatsa
300camerawithperfectsettingsbeatsa3,000 camera on auto every single time. I’ve tested this across hundreds of product shoots, and the difference is stark.
In this guide, you’ll learn exactly what dials to turn, why they matter, and how to replicate studio-grade results consistently just like working with a professional image editing service provider. No fluff. No theory that doesn’t work in the real world. Just actionable camera settings for ghost mannequin photography that deliver.
What Are the Best Camera Settings for Ghost Mannequin Photography?
The short answer? Manual mode. Aperture priority will betray you when lighting shifts. Shutter priority introduces chaos. Manual mode gives you complete control.
Core settings at a glance:
| Setting | Value | Why It Works |
| Mode | Manual (M) | Full creative control |
| Aperture | f/8 – f/11 | Deep depth of field |
| ISO | 100 | Zero digital noise |
| Shutter Speed | 1/125 – 1/160 | Freezes motion |
| White Balance | 5200K (Daylight) | True color reproduction |
| Focus | Manual | Consistent sharpness |
| File Type | RAW | Maximum editing flexibility |
This combination delivers edge-to-edge sharpness. You’ll capture every stitch, every texture, every subtle shadow that makes garments look three dimensional. And here’s why that matters for the ghost mannequin technique: the “ghost” look requires the neck and arm openings to vanish seamlessly. Blurry edges ruin the illusion immediately.
Why Does Aperture Matter So Much for Ghost Mannequin Photography?
Let me paint you a picture. You’re shooting a black blazer. The lapels are sharp, but the sleeves look soft. The collar is crisp, but the hem is fuzzy. What happened? Wide aperture happened.
Wide apertures like f/2.8 or f/4 create beautiful background blur bokeh, they call it. For portraits, gorgeous. For product photography? A nightmare. Your garment needs to be tack-sharp from front to back.
Aperture impacts on ghost mannequin photography:
- f/2.8 – f/5.6: Too shallow. Only part of the garment stays sharp.
- f/8 – f/11: The sweet spot. Maximum sharpness across the entire product.
- f/16 – f/22: Diffraction starts softening details. Avoid this.
Stick to f/8 as your starting point. If you’re shooting small items like ties or scarves, f/8 works beautifully. For longer garments like coats or dresses, f/11 gives you that extra depth without diffraction.
How Does ISO Affect Ghost Mannequin Image Quality?
Here’s something that surprises beginners. ISO 100 isn’t just a suggestion. It’s the law for studio product work. Why? Noise.
Digital noise looks like tiny specks of sand scattered across your image. At ISO 400, it’s barely visible. At ISO 800, it starts crushing shadows. At ISO 1600, your beautiful black dress turns into a grainy mess. And here’s the kicker post-processing noise reduction softens details. You lose texture. You lose sharpness. You lose the “expensive” look.
Keep ISO at 100. Always. If your image is too dark, don’t touch ISO. Adjust your lights or slow your shutter speed. ISO is the last lever you pull, not the first.
This becomes especially critical when you later use a ghost mannequin app or ghost mannequin AI tool. Clean source images mean clean extractions. Garbage in, garbage out AI can’t fix what isn’t there. That’s why many studios rely on quick image editing with professional clipping path service workflows to maintain consistent quality.
What Shutter Speed Creates the Sharpest Ghost Mannequin Photos?
Let’s do some quick math. You’re shooting with a 50mm lens. The old rule says your minimum shutter speed should be 1/50 second. But that’s for handheld shooting. You’re on a tripod, right? (You should be.)
Even on a tripod, I never go below 1/125 second. Why? Mirror slap. Shutter vibration. The tiny movements your tripod can’t stop. At 1/60, those vibrations blur fine details. At 1/125, they disappear.
Recommended shutter speeds for different setups:
| Lighting Setup | Shutter Speed | Notes |
| Continuous LED | 1/125 – 1/160 | Standard studio strobes |
| Speedlights | 1/160 – 1/200 | Watch for sync limits |
| Constant daylight | 1/100 – 1/125 | Only if absolutely necessary |
Here’s a pro trick. Use your camera’s electronic shutter if available. It eliminates shutter shock completely. Then you can shoot at 1/100 without worry. But when in doubt? 1/125 is your reliable friend.
Which Lens Should You Pair with These Camera Settings?
The right lens makes the best camera settings ghost mannequin photography actually shine. A 50mm prime on a crop sensor equals roughly 80mm. A 100mm macro on full frame gives you perfect working distance.
Top lens choices:
- 50mm f/1.8 – Budget-friendly, sharp, versatile
- 85mm f/1.8 – Ideal working distance, minimal distortion
- 100mm f/2.8 macro – Professional choice, zero distortion
Avoid wide-angle lenses like 24mm or 35mm. They distort straight lines your garment’s hem will curve, buttons will stretch, and nothing will look right. Also avoid zooms with variable apertures. They force you to re-calculate exposure every time you zoom.
Set your lens to manual focus. Autofocus hunts. It hesitates. It occasionally misses. Manual focus with live view at 10x magnification guarantees perfect focus every single time. Focus on the garment’s center—usually the chest or collar area.
How Do Lighting Setup and Camera Settings Work Together?
You can’t separate camera settings from lighting. They’re dance partners. One leads, the other follows.
Standard ghost mannequin lighting setup:
- Two soft boxes at 45-degree angles – Eliminate shadows on the mannequin
- One backlight – Separates garment from background
- Fill card from below – Lifts shadows under collars and sleeves
With this setup, your camera settings for ghost mannequin photography should start at f/8, ISO 100, 1/125. Then take a test shot. Adjust your lights before touching your camera settings. This is crucial. Too many photographers chase settings when the real problem is light placement.
A quick story. I once watched a photographer spend 45 minutes adjusting shutter speed and aperture, getting increasingly frustrated. His image was consistently dark. The problem? His soft boxes were six feet too far away. He moved them to three feet, dropped to f/11, and nailed the shot in one frame. Trust the light first.
What Role Does White Balance Play in Ghost Mannequin Photography?
Color consistency separates amateurs from pros. Your female ghost mannequin images need to match across an entire product line. A white shirt shouldn’t look cream in one photo and blue in another.
White balance settings by light source:
| Light Type | Kelvin | Camera Setting |
| Studio strobes | 5200K | Daylight |
| LED panels | 5500K | Daylight +1 |
| Flash | 5600K | Flash preset |
Shoot a gray card reference frame before every session. In post-production, click that gray card, and every image batch-syncs to perfect color. This takes ten seconds. Skipping it costs hours of correction.
And here’s something most guides won’t tell you. Different ghost mannequin AI tools respond differently to color casts. A slight blue tint might fool one algorithm. Another might struggle with green shadows. Neutral gray is the universal language. Speak it fluently.
Why Shoot RAW Instead of JPEG for Ghost Mannequin Photography?
JPEG is convenience. RAW is control. Which one sounds like professional work to you?
RAW advantages for ghost mannequin editing:
- Recover blown highlights by up to two stops
- Adjust white balance without quality loss
- Extract shadow details without introducing noise
- Edit seamlessly with any ghost mannequin app
JPEG locks in your settings. If your white balance is off by 200K, you’re stuck. If your exposure misses by half a stop, you lose detail forever. RAW gives you a safety net. Storage is cheap. Reshoots are expensive.
I shoot RAW+JPEG as a backup. The JPEGs go to quick client proofs. The RAWs go to final editing. This workflow saves time without sacrificing quality.
How Can a Ghost Mannequin App Simplify Your Post-Processing?
Here’s where technology does the heavy lifting. Manual cloning and masking used to take 20 minutes per image. A ghost mannequin app cuts that to 30 seconds.
Popular ghost mannequin tools:
- Photo room – Excellent AI, offers ghost mannequin Photo room integration
- Clipping Path One– Enterprise-grade, consistent results
- Remove.bg – Fast but less control
- Clipping Magic – Good manual refinement tools
Look for ghost mannequin AI free options to test workflows. Many offer 5-10 free images. Run your test shots through different tools. See which handles tricky areas like armholes and necklines best.
The ghost mannequin technique works because AI recognizes the mannequin shape and removes it intelligently. But AI isn’t magic. It needs clean source images. Those come from your camera settings. Garbage in, garbage out. Clean in, perfect out.
Real-World Example: From Camera Settings to Final Product
Let me walk you through an actual shoot from last month. A denim jacket for an e-commerce brand. The shoot required consistent results across 40 color variations.
The setup:
- Camera: Canon R6
- Lens: 85mm f/1.8 (shot at f/9)
- Settings: ISO 100, 1/125, 5200K
- Lighting: Two Godox strobes with softboxes, one rim light
- Mannequin: Female half-form with adjustable shoulders
The process:
- Placed the mannequin on a seamless white backdrop
- Set camera to manual, dialed f/9, ISO 100, 1/125
- Lit the jacket until the histogram sat perfectly centered
- Shot a gray card reference
- Captured 40 jackets in 90 minutes
Post-production:
- Imported to Capture One, synced gray card white balance
- Exported 16-bit TIFFs to Photoroom
- Used ghost mannequin Photoroom AI to remove the mannequin
- Batch-processed all 40 images in 12 minutes
The result? Flawless floating jackets with consistent color, sharp seams, and zero editing fingerprints exactly what highlights the importance of e-commerce image editing services for product-driven brands. The client approved the entire batch on the first review. That’s what correct camera settings deliver.
Common Ghost Mannequin Photography Mistakes (And How to Avoid Them)
Even experienced photographers mess these up. Don’t be that person.
Mistake #1: Using auto white balance
Auto white balance changes subtly between shots. One jacket looks cool. The next looks warm. The customer thinks the colors are different when they’re not. Fix: Manual 5200K always.
Mistake #2: Shooting at maximum aperture
That f/1.8 lens is sharp at f/8, not wide open. Every lens has a sweet spot. Find yours. Usually, 2-3 stops down from maximum.
Mistake #3: Forgetting to lock focus
Touch the focus ring accidentally? Your next 50 shots are soft. Fix: Use gaffer tape to lock the focus ring. Seriously. This works.
Mistake #4: Ignoring the histogram
The back-of-camera preview lies. The histogram never lies. Expose to the right without clipping. This gives you maximum data for editing.
Mistake #5: Using the wrong ghost mannequin technique
Some garments need complete removal. Others just need hollowing. Learn the difference. A thick sweater needs different treatment than a silk blouse.
Expert Tips for Advanced Ghost Mannequin Results
Ready to level up? These tips separate good photographers from great ones.
Focus stacking for deep garments
Shooting a long coat at f/11 still might not get every button sharp. Focus stack instead. Shoot three frames—front, middle, back—and blend in Photoshop. Time-consuming? Yes. Worth it for hero images? Absolutely.
Tethering changes everything
Don’t chimp. Don’t pull cards. Tether directly to Capture One or Lightroom. See every image on a 27-inch screen as you shoot. Catch focus issues immediately. This alone will improve your sharpness by 30%.
Create a settings preset
Save your camera settings for ghost mannequin photography as a custom preset (C1, C2, etc.). One button. Perfect settings. No dial-twisting between setups.
Test your shutter sync
Every camera has a maximum flash sync speed. Exceed it, and black bands appear across your frame. For most cameras, that’s 1/200 or 1/250. Know yours. Stay under it.
Conclusion
Mastering camera settings for ghost mannequin photography isn’t complicated. It’s deliberate. Set your camera to manual. Dial f/8 to f/11. Lock ISO at 100. Choose 1/125 shutter speed. Use daylight white balance. Shoot RAW. Manual focus with live view. These choices stack together like bricks, building a foundation of consistent, professional-quality images.
The best ghost mannequin technique in the world won’t save soft photos. The most expensive ghost mannequin AI can’t fix bad exposure. Start at the source. Get your camera settings right, and everything else becomes easier—faster editing, happier clients, and work you’re genuinely proud to share.
Now go set up that tripod. Your perfect ghost mannequin shot is waiting.


